Sunday, May 31, 2015
The Zhumell Z10

As you know if you've been reading here lately, I’ve returned to my visual observing roots. The
telescopes I’ve been using most for that have been my two Dobsonians, an 8-inch
f/5 of Konus heritage, and Old Betsy my 12-inch truss tube telescope who was
once, long ago, a Meade StarFinder. Both are good telescopes, but, frankly, the
8-inch is sometimes a little small for my compromised backyard and the 12-inch
a bit of a pain to set up for my less formal observing runs. What about
something in-between, I thought, like a nice 10-inch f/5 Dob?
Since we’ve moved to the suburbs, I’ve pretty successfully
focused on selling/giving away telescopes rather than acquiring more (I still
have an RV-6 I’d like to find a home for locally), so I didn’t feel guilty
about bringing a new one into the house.
Luckily for me, there’s no shortage of bargain 10-inch Dobsonians. Synta
and GSO, the two big Chinese telescope makers, have seen to that. If you want to
keep the price down, both have 10-inchers to tempt you. Synta selling under its own SkyWatcher brand
and to their heretofore main outlet, Orion (Telescope and Binocular Center), where Syntas are sold under that company’s logo in a variety of configurations ranging
from basic manual scopes (what I had in mind), to Orion’s “Intelliscope” DSC
rigs, to full goto and tracking equipped versions.
Then there is GSO, who markets their Dobsonians under the
Zhumell brand and to a few independents like Alabama’s Opticsmart,
who tweak and tune the GSOs as the Apertura Dobs. Oklahoma's Astronomics also occasionally dispenses them under their Astro-Tech brand as well. Normally, however, Zhumell, is distributed by
that Internet sales giant Hayneedle from their telescopes.com outlet (plural,
singular is Orion’s website).
 The Apertura Dobs were a natural, I thought, but had a
couple of strikes against them. Opticsmart is in Alabama, so I’d have to pay
sales tax. Also, while I admired the extras of the Aperturas, flocking and
other such niceties, I wanted to keep the price as low as possible.
The Apertura Dobs were a natural, I thought, but had a
couple of strikes against them. Opticsmart is in Alabama, so I’d have to pay
sales tax. Also, while I admired the extras of the Aperturas, flocking and
other such niceties, I wanted to keep the price as low as possible.I liked the white tubes of the Astro-Tech Z10s, and Astronomics is an outfit I've bought from frequently over the last 20 years, but, as is common with their Astro-Tech brand lately, the Dobs were out of stock with the website mentioning a "waiting list," which didn't sound good to impatient me.
How about Orion? Certainly an OK choice but for two things.
Their cheapest house-brand Synta 10-inch , the XT-10 Classic, is 600 bucks, 100
more than the comparable GSO and also a little plain Jane compared to the Zhumells.
There is no question you get more for your money with the
GSO Dobsonians, beginning with adjustable tension altitude bearings that are
considerably more sophisticated than the XT10’s spring-attached-to-the-bearings-trope balance aid. Said altitude bearings on the GSOs can also be moved forward or
back with reasonable ease to cure most imbalance problems. One thing that may give prospective GSO purchasers pause is the fact that the Dobs use a lazy Susan bearing for azimuth rather than Teflon pads on Formica. More on this shortly.
It’s in the fittings and accessories that the GSO scopes
really pull ahead. The two-speed Crayford of the GSOs is clearly
superior to the single speed unit of the Orion. The Z10 10-inch features a 50mm
RACI finder that’s quite a step up from the Orion’s red dot job. There’s a
battery powered fan to speed cool down with the Zhumell—that’s an extra cost
option on the Orions. There are two eyepieces shipped with the Z10 including a
2-inch 30mm that is not bad as a finding eyepiece I was given to understand (the
Orion comes with a single cheap 25mm Plossl). Oh, and the GSOs even sport laser
collimators.

Synta/SkyWatcher has also introduced a line of traditional,
non collapsible Dobbies. These were just coming on line however, and didn’t
seem widely available. At at any rate, they didn’t seem to have features
that would impel me to choose one over a GSO.
So a Zhumell Z10 it would be. When I’d made my mind up,
there was really no drama involved in ordering. I got on the Telescopes.com
website, turned over my credit card number and I was done. The scope was 499
with free shipping, but I elected to spend a little bit more for FedEx ground
service. The final damage was just a smidge, and only a smidge, over 500.
The most significant thing about my order? The way Hayneedle
just has its act down. I ordered the
10 on Thursday morning and it was on our porch Saturday afternoon. This is the
third item I’ve bought from these people and their service is unparalleled no
matter what you buy, whether a nice mid-century modern clock like the one over our mantelpiece, or the Happy Hand Grenade 100-degree AFOV eyepiece I got from them a couple of years ago.

The only thing I was a little worried about was whether
they’d get the big 10-inch to me in one
piece. There was a hole in the
OTA’s box when it showed up Saturday just before 4 p.m., but the inner carton had not been penetrated and
all was well. With Dorothy’s help, I got the two boxes (one obviously
containing the mount) into the Sunroom, the usual site of my equipment
assembly.
How difficult was the procedure? Not difficult at all if
you’ve assembled Ikea furniture or similar. I did make one mistake with the
front board of the rocker box and had to back up a little at the very end, flipping
the board around so the handle mounted to it was secure. Mostly, the way to
proceed was clear once I downloaded the scope’s manual. Yep, there isn’t one in
the box, you need to download and print a .pdf. There’s also an assembly video which
is really all you need to ensure success.
Actually, there’s not a lot to do nor a lot to go wrong when
assembling the mount. Rocker box sides and front go together with long screws
in pre-drilled holes. Three feet go on the ground board. Rocker box and ground
board go together with a pivot bolt.
There is one thing about the mount you may
or may not like, which I hinted at above. The Synta Dobs still rely on the traditional Teflon and Formica for the
azimuth bearings of the scopes. The GSOs, on the other hand, use large lazy
Susan bearings. How much you will like this arrangement depends on you. I’ve
always preferred super easy azimuth motion, but some folks will not like it. This is both a point in favor of and against the GSOs depending on your perspective, as all their Dobsonians use this
bearing system for azimuth.
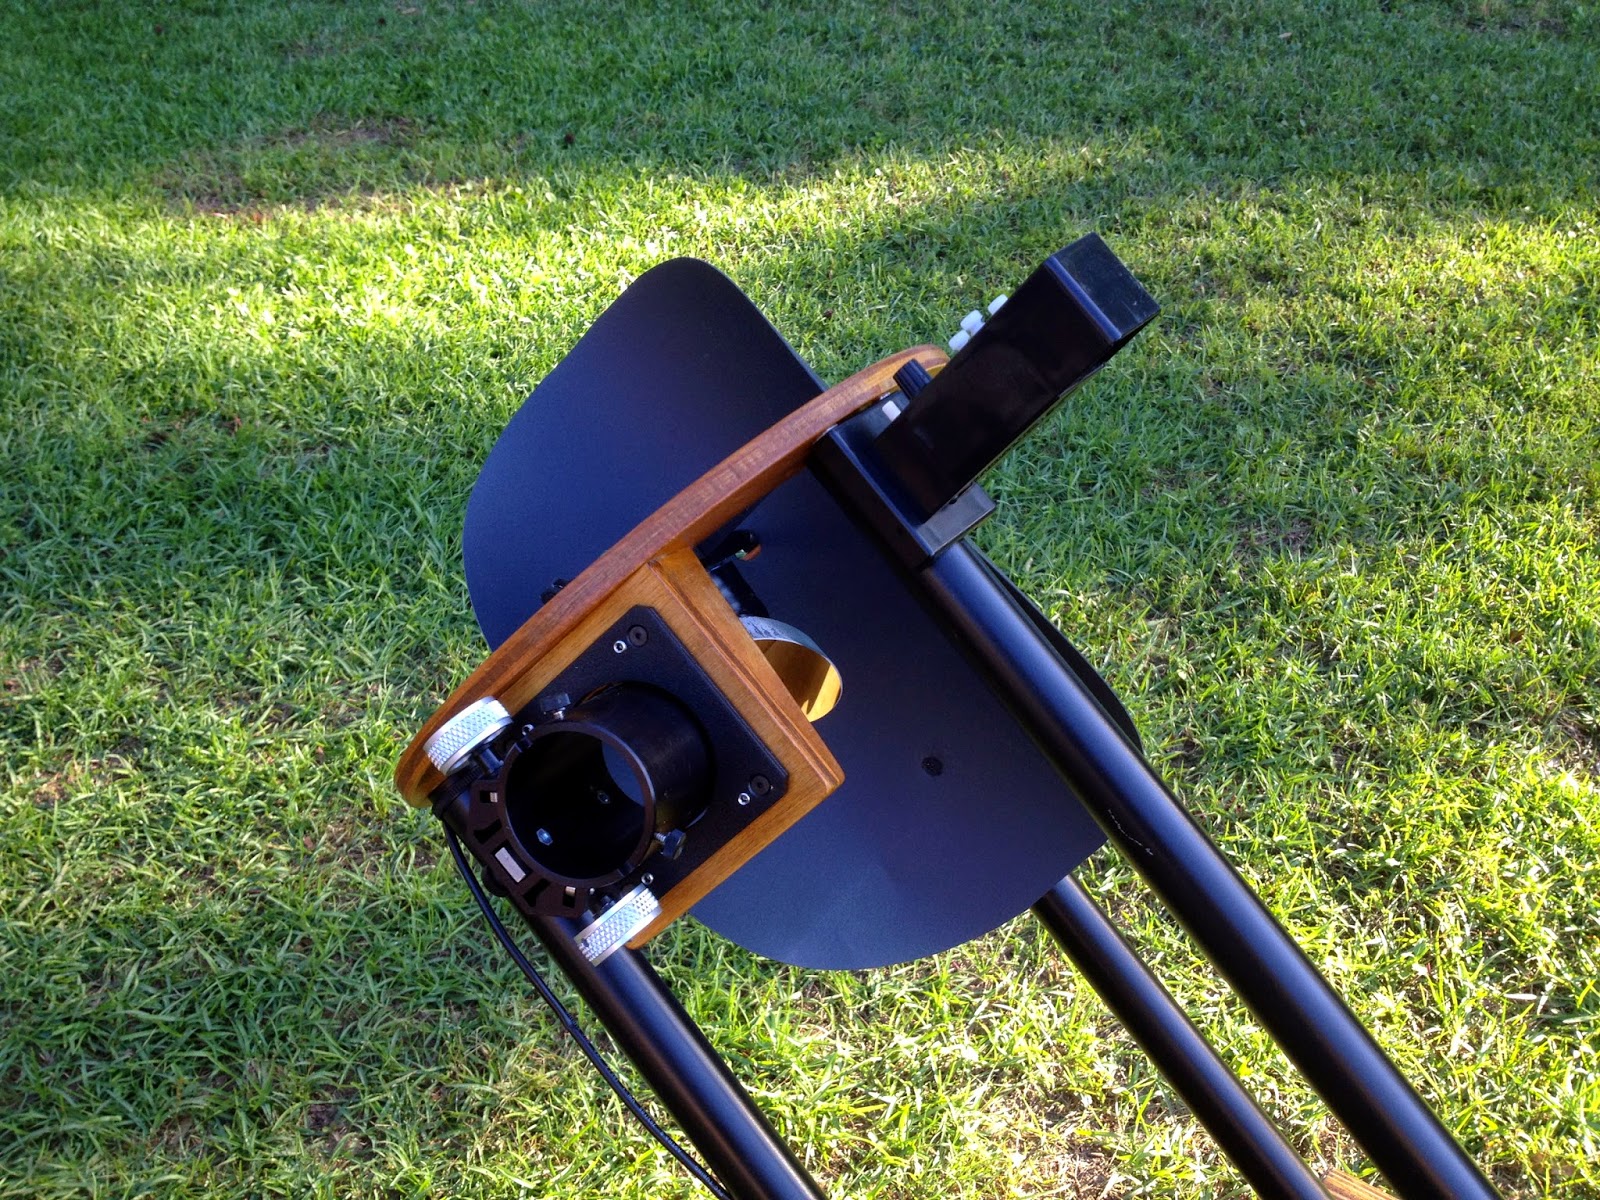
Time to get to the good stuff, the big OTA and its accessories. I assembled the tube with the side bearings at their mid
positions (zero on the provided scale) as a starting point. You must remove tube from rocker to adjust the bearing positions, but that isn't a big deal. I then horsed OTA into rocker. Make no
mistake, yes, this is just a 10, but a 10-inch solid tube (steel tube) Dobsonian is not exactly lightweight. Make sure you want to handle one or back off to an 8-incher.
Minor complaint? Like my old friend Pat, I've come to believe after all these years that white is the best color for a telescope tube. Thermally cooperative. Doesn't show fingerprints easily. Looks clean and elegant. Nevertheless, all cats, and even Newtonians, are, like the Z10, black in the dark, so I guess black is OK too.
Minor complaint? Like my old friend Pat, I've come to believe after all these years that white is the best color for a telescope tube. Thermally cooperative. Doesn't show fingerprints easily. Looks clean and elegant. Nevertheless, all cats, and even Newtonians, are, like the Z10, black in the dark, so I guess black is OK too.

Naturally I needed to collimate, to align the optics of this f/5 telescope so it could perform its best. I had heard tales about the
accuracy or lack thereof of the included laser, so decided to leave that for
later, and used my good old Chershire/Sight tube to dial the scope in.
The secondary (adjusted with Phillips head screws, unlike the Synta scopes, which use Allen head screws) needed minor tweaking, which was also all the primary required. The bolts for the primary are serviceable and consist of three knob headed and spring loaded adjustment bolts and three knob-headed locking bolts. Naturally, as with the old push-pull cells, the lock bolts have to be tightened sequentially and by the same amounts or you change the collimation set by the adjustment bolts. I ruled the collimation of the scope very easy. Surprisingly so.
Bob’s Knobs are available for both secondary and primary and I may take advantage of that option depending on how the telescope holds collimation. Stronger springs are another option that Scopestuff and other sell, but I thought the springs worked OK. The primary is center-dotted with a small paper reinforcer, and its position looked OK to me, contrary to what some buyers have reported in the past. I didn't remove the primary cell to check the mirror restraining clips to make sure they are not too tight—another problem some buyers have reported—but the star test didn't reveal signs of that, so they are apparently OK.
Once my Z was together and collimated, I spent a little while admiring her. Again, the big deal was how much how little money gets you
these days. I had quite a pile of STUFF—eyepieces, mirror cooling fan battery holder, laser collimator, Moon filter—on the table next to the Z10. However, the only true test of a Dob is under the stars, naturally.
Amazingly it appeared I’d get first light on this first night. The storms that
have been plaguing us had abated. Sometimes I do get lucky.
 And lucky I was on this night. The new telescope mostly cooperated. I always expect a commissioning period, a time of getting the kinks out of a new instrument. Usually, my first experience with a new scope is more frustrating than exhilarating. There didn't seem to be too many kinks to get out of the Z10, however. For the most part, it just worked.
There wasn't that much eye candy on display thanks to a large and gibbous Moon, but Jupiter was a spectacle, with the Great Red Spot sharp and clear. Luna was also beautiful as she always is. I scanned around a little for some DSOs, but the mosquitoes were terribly fierce after the rain and the lack of a zero power finder meant I didn't turn up much. Still, I've had more aggravating first lights for far more expensive telescopes.
How about a star test? The seeing sucked despite high humidity, but from what I could tell on Arcturus, the optics are fine and my rather casual approach to collimation was sufficient. Jupiter was probably a better test, anyway. I've observed the King enough over the years to know how he should look in a good 10 - 12-inch scope, and when the seeing settled once in a while, man did he look good. Mucho detail. I also took a gander at Venus, who was her usual mysterious veiled self, but sharp, nevertheless.
There will always be a few problems at first light for any telescope. The Z10's focuser is fine, but my Ethoses wouldn't come to focus without the 1.25-inch adapter that came with the scope. There just wasn't quite enough out travel. A couple of other 2-inch eyepieces were on the hairy edge, too. Not unusual for a store-bought Newtonian, but a little trying. I hate having to pull an eyepiece out for it to focus. I will collimate again this morning, pulling the primary as far back as possible. If the 13 and 8 Es still won't come to focus without the adapter, I'll buy a 2-inch extension tube for the focuser, I suppose. Otherwise, the focuser's action and the 2-speed feature worked well--very well indeed. This is a long way from the Chinese rack and pinion focusers of yore, y'all.
I was happy with the azimuth motion once I cranked down the knob on the pivot bolt. Some of you would still think it is too easy, however. Me? One of the things I hated about Old Besty when she was in her StarFinder body was the dadgummed too stiff altitude motion. I've seen the same on many import Dobs. I much prefer the lazy Susan. I was even more impressed by the altitude setup. With sufficient tension on the knobs on both bearings, any eyepiece I tried balanced with the scope. This is mucho bettero than springs or beanbags or welding magnet-weights, folks.
Biggest impediment on this evening, however, was the lack of an easy-to-use finder. I've got a Rigel Quickfinder mounting base on order. A 50mm finder, even a RACI finder, is difficult for me to use, heavy moonlight or not. I need that zero-power reticle floating before the stars I can see with my naked eye, not the confusing groups of suns revealed in an optical finder. Most of you will likewise want a Telrad or Quickfinder base.
Anyhoo, one more mosquito bite and I'd reached my infamous I Have Had Enough stage, covered Z with one of my Desert Storm covers, and headed for the Den where I turned on Netflix and ended my evening in appropriate fashion with Season One of the History Channel's Universe.
2018 Update
What has changed and what hasn't changed in the intervening three and a half years since the telescope who became known as "Zelda" came to live with me?
When it comes to the Synta and GSO telescopes themselves, not much. The models I mentioned here are all still current. Different accessory lineups come and go, but even those have remained much the same. What has changed is where you can buy a 10-inch GSO Dobbie, and how much any of the 10-inchers in this class are gonna cost you.
First things first, Hayneedle sold its telescopes.com website/business. That continued on for a while, but is now either gone or mutated into a website called "Telescopes Plus" (typing "telescopes.com" takes you to Orion). Honestly, I don't know the complete story, and trying to keep up with the affairs of Chinese telescope sellers is, yes, like herding cats.
Suffice to say, however, Telescopes Plus are selling both the GSO 10-inch Dobs under both the Zhumell and Apertura labels. Unlike before, however, the Aperturas (I have no idea whether they are still sourced from the Alabama folks) apparently don't offer any of the mods that originally brought them to my attention. They seem to be exactly the same as the Zhumell-branded scopes now. Beyond that, I know nothing of Telescopes Plus. If I do learn more, I will clue you in.
As for the Synta bunch, whether SkyWatcher or Orion branded, the 10-inchers are also pretty much the same as they were when I wrote this in the late spring of 2015.
What has changed? How much you will pay whether you buy GSO or Synta. Oh, I know the miniscule amount I spent, $499.00, was plain crazy, but it's still somewhat disturbing how much the fare has risen. While I haven't visited every website nor checked for sales at Orion, it appears that at this time a basic no-tracking/no-goto/no-DSC 10-inch will set you back about 600 bucks--and unlike when I got Zelda from Hayneedle, you'll probably pay a fair amount for shipping. This is still a heck of a deal for a 10-inch telescope, of course. Why the increases? Well, when I bought, the price for a telescope of this aperture and generously equipped with accessories seemed artificially low. I also wonder if the tariff foolishness has had an effect.
And it's not all gloom and doom either. While the basic scopes have gone up in price, it appears SkyWatcher has held the line on its fancier models. The collapsible tube 10-inch, for example, is still at 699, making it a more attractive possibility then when I bought Zelda. Back then it was almost 200 more than the basic GSO 10er. Today, Telescopes Plus charges 699 for the exact same scope and accessories I got.
How about my Zhumell, good old Zelda? She is keeping on keeping on, just like me. I will admit I haven't used her that much over the last year, but with the coming of fall, improved weather and (probably) me starting on a new visual deep sky observing book, I believe that will change.
Sunday, May 24, 2015
Going Paper

Which is the opposite of the direction we are supposed to be going
in in amateur astronomy and everything else. We are supposed be going paperless.
However, I am experimenting with that opposite, temporarily at
least. As I said not long ago, I will not give up my favorite applications like
SkyTools, Deep Sky Planner, and AstroPlanner
(more on the latter soon). Still, books appeal to the desire to simplify that
has taken hold in me of late. Also, it is nice not to have to disconnect
the computer and drag it outside.
Why would I have to disconnect a computer to take it
outside? Why not just use my astro-laptop? I lost my desktop, a nice Toshiba
all-in-one, the other day when its hard drive crashed. Should I run out and
replace it immediately? Or just tear it open and replace the failed drive? I
wasn’t sure. To tell you the truth, I am
tired of Windows. Tired of the constant updates. Tired of the frequent
revamps of the o/s. I didn’t much like Windows 8, and didn’t think I’ll like
10, either. I decided I'd use my Win 7 laptop as my primary computer while
deciding what to do.
I’d begun to think my eventual direction might be a switch
to a Macintosh desktop and, when the Toshiba laptop, my astro-computer, dies,
to an iPad or a Macbook for use in the field. But I decided not to do anything right away. It will be a busy
summer. This fall, if everything remains as it is now, maybe I’ll travel to
Huntsville’s Apple Store (we don’t have one here in Mobile) and get a nice
shiny iMac. Till then, I’d use my old Win 7 netbook for astronomy.
Which worked, sort of. SkyTools
and DSP run on the little atom processor powered thing, if not well. Not well
at all. “You know, Rod,” I thought, “there are still these things called ‘books.’”
Books, star atlases, are a longtime fascination for me. I like maps, and thought
it might be nice to use ‘em again for a while.
The only question was "Which atlas?" I've got most of the mainline atlases and decided I wouldn't mind buying one more if I thought something I didn't have would serve better. Buying a book, after all, is much less stressful than buying and setting up a new computer.
The only question was "Which atlas?" I've got most of the mainline atlases and decided I wouldn't mind buying one more if I thought something I didn't have would serve better. Buying a book, after all, is much less stressful than buying and setting up a new computer.
One thing was sure no matter which star atlas I chose, even today "print" has its advantages. You
don’t have to charge a printed book's battery, print atlases are relatively cheap, and they go deep enough for most
purposes depending on the volume in question. Funny thing, too? Despite the supposed
superiority of computer star maps, we are living in a golden age of the
star atlas with more available than ever before. There are a couple of out-of-print
MIAs, but you may be able to get even those from Amazon or Abe’s.
Before we outline what I have used and intend to use and what you might want to use if you decide to follow me,
let’s talk about what we don’t want to mess with. That is 6th
magnitude atlases, whether the original Norton’s Star Atlas, one of its reworked descendants, or any other book that only
shows star down to magnitude 6. These works are OK for 10 x 50 or smaller
binoculars, but that is it. They do not show enough stars to make star hopping
to objects easy—or sometimes possible—even with a 3-inch telescope. Yes, I know
many of us Baby Boom Astronomers have fond memories of Norton’s; it was for
many of us our first serious book of charts. But do you remember how much
easier finding stuff got when you upgraded to Skalnate Pleso (in some sense the antecedent of Sky Atlas 2000, youngsters)?
Sky & Telescope's Pocket Sky Atlas
This one, by Roger Sinnott, is my current favorite grab and go atlas.
While it’s too large for the pocket of your jeans unless your name is “Incredible
Hulk,” at 6 by 9-inches it is nice and compact and easily stashed. There is a
copy permanently stationed in the top compartment of the fishing tackle box I
use as my small equipment case. Its small size does not mean it is not a powerful
tool, however.
This is a big step past Norton’s.
Pocket goes down to nearly magnitude 8 and includes 1500 deep sky objects. More
often than, not, that is all I need, even with my 12-inch scope. Despite
its compact size, the atlas does not sacrifice readability. The charts are
clear and legible with dark stars on a white sky—which most observers find
easier to read than the opposite under dim red light—and appropriate use of
color. Hard to best this for 20 bucks. Single downcheck? I wish the index of
constellations were on page one. Other than that it is hard to find fault with
Pocket. I love it.
Sky Atlas 2000
 |
| SA2000 Deluxe |
After Skalnate Pleso
came Sky Atlas 2000 by renowned
celestial cartographer Wil Tirion (who I had the pleasure of dining with at one
long ago Peach State Star Gaze). It is much like the old S-P; but has more of
everything. More stars, more deep sky objects, and, importantly, it was the
first widely available atlas for Epoch 2000. As time went on, it was produced
in versions to fit every taste.
What I used for years was the Desk Edition. Despite its
name, I found it more useful outdoors than the Field Edition, since it featured
black stars on white sky, the reverse of Field. It was on heavy stock, and was
never harmed by even my heavy dew. The size is generous, 18 x 32, and with a
limiting magnitude of 8.5 and 2700 deep sky objects, this has been my bread and
butter atlas for years. As normally sold, the charts are separate, unbound
sheets (the Field Edition is the same). I fastened mine together with binder
clips which worked fine for years.
Not fancy enough? You can step up to Sky Atlas 2000 Deluxe.
It is (spiral) bound, in color, and for many folks is all they will ever need.
Like Desk, it is white sky/dark stars and is one of the more legible sets of
charts I have encountered.
You can actually take another step up, and buy Deluxe (or
Field or Desk) with laminated charts. Frankly, I discourage that choice. The
normal paper pages are heavy enough that they, as above, have never been harmed
by my heavy Gulf Coast dew. There’s one other beauty of non-laminated. You can
write notes on your charts, a big benefit of paper. You can’t do that
with a laminated copy without resorting to dodges like grease pencils or
erasable markers. My pick is “Deluxe, unlaminated,” which will set you back
about 60 bucks and which is worth every penny.
Uranometria 2000
Mr. Tirion didn’t rest on his laurels after SA2000. In
addition to contributing to other projects, he did the cartography for the next
step up, Uranometria 2000. Tirion, Will Remaklus, and Barry Rappaport’s work was, when
it debuted, one of the most absurdly deep atlases most of us had laid
eyes on. Its stellar limiting magnitude is 9.75, and the DSO count is a full
30,000 for the 18 x 12-inch book (that’s the size of each double page chart).
 |
| Uranometria 2000 |
Is there anything bad to say about U2000? Not really, other
than the fact that at this level of detail you are beginning to push the
boundaries of what is practical with a book. You probably won’t want to use
U2000 by itself. Doing that would involve a lot of page flipping whether you
have the original two-volume edition or the current “pole to pole” one volume
version (my choice). You use it in conjunction with SA2000 or another broad
coverage atlas of your choice for close-ups when needed. 60 dollars will get
you the single volume U2000, and another 60 will get you the companion “Field
Guide,” which contains catalog data and object lists and is somewhat useful.
The Herald – Bobroff Astro Atlas
Flipping between two books, SA2000 and U2000, doesn’t sound
like much fun? There is an alternative, or at least their used to be, the Herald – Bobroff Astro Atlas (1994) from
Australia. It is notable for three things: its large size (12.5 x
16.5-inches), the amount of information contained in its pages; and its inclusion of six series of charts,.
Certainly, being big is a help. This atlas, which, as is
usual for observer’s atlases, has white skies and black stars, is eminently
readable, moreso even than SA2000 Deluxe, and is perhaps the most easily
readable atlas I’ve used. The pages are glossy, heavy, and very dew resistant.
Those big pages are also jammed with symbols that convey a
wealth of information about objects. So much, that you may not normally need
other reference materials. These symbols and labels are easy to read, but their
variety and numbers mean you tend to forget what they are. The H-B does have a
handy card that helps you decipher them, however. When I use the atlas
reasonably frequently, it’s no problem to figure out what it is trying to tell
me.
 |
| Herald-Bobroff |
There’s no denying, however, that the atlas’ big draw is
that it covers the sky three separate times, with each series going into more
detail. For crowded areas like Virgo’s Realm of the Galaxies, there are three
more series. You begin with “A,” which is comparable to Norton’s and is mostly
useful for rough navigation, move to “B” which is your “Sky Atlas 2000,” and
wind up with “C,” which is comparable to Uranometria, all under one cover. When
you need help with difficult areas, the three extra series are there to aid you
(though most of their coverage is invisible to us Northern Hemisphere
observers).
Herald – Bobroff, which I bought not long after it was
published, is my “serious” atlas; it is for those times when SA2000 is not enough.
Unfortunately, by the time I bought it, Megastar has come on the scene and I
was deserting paper. I may use it much more now than I ever have if my present
mood continues (which I believe it will), though.
Can you? Likely not. The original version has been out of
print for ages. It comes on the used market occasionally, but you can bet you
will pay far more for it than its original $90.00 price. Lymax Earth and Sky
sold a reprint in slightly smaller format for a while, but even their version
has been out of print for years. Shame, since H-B is one of the greatest print atlases
every produced. If not the deepest.
There may be salvation at hand for those of you who want
Herald-Bobroff. It’s the somewhat similar German atlas Interstallarum. It doesn’t feature H-B’s
series paradigm, but it goes deep, down to magnitude 9.75, is large, and is, like H-B, packed with informative symbols, maybe even
being an advancement over Herald-Bobroff in that regard.
The Millennium Star Atlas
Millennium is and will likely remain the penultimate
non-photographic star atlas. How could it not? Roger Sinnott and Michael
Perryman’s atlas, based on the catalog produced by the ESA’s Hipparcos
satellite, contains 1548 charts showing one million stars and some 10,000 deep
sky objects. These charts are contained in three fat volumes, and the
white-sky/black-star charts are printed on (necessarily) rather thin stock.
 |
| H-B Legend |
The physics department where I teach astronomy owns a copy
of Millennium, so I can use it whenever I choose. Alas, those times are rare. The scale of the atlas is 100-arc seconds
per millimeter for the entire sky, not much different from the view in a C8, but it turns out that is too much.
For me, Millennium's small scale makes it too
confusing to navigate with under dim red light. Yes, the pages show the field visible in the C8, but it is mirror reversed,
naturally, from what I see in my SCT—no print atlas can help with that. Even
with a larger scale atlas to assist, it is not overly pleasant to use
Millennium. The atlas’ thin pages stand up surprisingly well to dew, but to say
they are as dew resistant as those of the inexpensive SA2000 would be wrong.
Most of you won’t want to take the Millennium plunge anyway. It is currently
out of print, and used copies can sell for over 1000 dollars.
Semi Print Atlases
Finally, we have semi-print atlases. They are not usually
available for purchase printed, but can be downloaded as .pdf files and printed
by you. Most are also free. The most outstanding one so far is
probably TriAtlas by Jose Torres. It is certainly ambitious, going to freaking
magnitude 12.5 and is packed with 11,000 DSOs. While its computer generated maps
certainly don’t rival those of Tirion, it is very clearly plotted and if
you don’t mind printing hundreds of pages, might be just the thing.
There is an even deeper one by Martin Meredith, an insanely
deep one, one that goes down to magnitude 18, for God’s sake. However, with a
scale of 14-arc seconds per millimeter it is not designed to be printed out (the
full set of charts would cover an acre and you would still need a magnifying
glass to read them), and not printing out kind of misses the point here, doesn’t
it? Still, this might be nice for someone who wants the depth of a modern
computer atlas without running a computer program to get that.
So what will I use? I won’t always use a print atlas, even
when I’m exploring the sky in my new-found simplistic matter. I will usually be
back to Skytools, or Deep Sky, or Deep Sky Planner, or AstroPlanner.
However, for those fairly frequent occasions when I foresee I will want to
forego the silicon sky, I will likely use Herald-Bobroff. I think so, anyway.
We’ll take a few test runs to see if I need to fall back on the even more "simple" of Sky Atlas 2000—stay tuned.
Sunday, May 17, 2015
What’s in MY Eyepiece Box?

The A Team
There are three eyepieces that get used more than any of the
others I own, or, really, have ever owned:
the 13mm TeleVue Ethos, the 8mm TeleVue Ethos, and the 16mm Zhumell 100.
The 13mm TeleVue
Ethos
My Ethos story began in 2007, which started out in rather
ho-hum fashion eyepiece-wise for me and everybody else. TeleVue was still the king
of the hill with their Naglers, which were much the same (despite incremental
upgrades) as always but as good as they ever had been. One thing had changed: the 82 degree AFOV wonders
were increasingly being challenged by imported eyepieces (the Naglers were and are
made in the Far East but are designed/QAed here). Not just by Meade’s recently
updated 82-degree series, but by upstarts like the William Optics Uwans. Was TV
going down?
Not hardly. In early 2007, at NEAF,
the world of amateur astronomy, visual amateur astronomy anyhow, was rocked by TeleVue’s
announcement of a new line of oculars, the Ethoses,
which would feature 100-degree apparent
fields, besting even the legendary Leica 90-degree ocular. We were further
told these eyepieces would do that with panache, matching any wide field on the
market for control of aberrations.
Lots of folks were skeptical. Especially the usual suspects
on Cloudy Nights. You know, the types who can review (and condemn) a new piece
of equipment without ever having laid eyes on it. Even trusting little old me
was skeptical. Was any eyepiece worth over 600 bucks? You can read the full
story here, the story of my conversion down
at the Chiefland Astronomy Village on a night when Pat Rochford and I were able
to borrow a 13mm Ethos for a couple of hours, but a quote may suffice:
What do I remember next? Pat took a look and started squawking. At first I thought [he’d] aspirated a pork rind. It soon became clear from his wild gesticulations, however, that he wanted me to look through the eyepiece. I did. And I was a goner.
(W)hat struck me first was not the 100 degrees. No, that was the last thing I noticed. The first thing that hit me was M43’s dark lanes. There is no doubt that Chiefland is dark, has great transparency, and has stable seeing, but I have rarely seen the dust lanes criss-crossing M42’s little comma-shaped companion stand out [better] than they did in this eyepiece on this evening. What else? The high contrast all across the field. And the tiny, sharp stars edge to edge. The incredible sharpness, as a matter of fact, of everything in the field. There was no point in ruminating further. I was sold.

Once I had the 13mm, I was surprised at how little I needed
anything else. With a Barlow, the TeleVue Big Barlow, in Old Betsy, my 12-inch
Dobsonian, or with the Denkmeier Power Switch diagonal in the SCTs, I could
cover most observing situations with a single eyepiece. Nevertheless, I thought
it would be nice to have a shorter focal length ocular, and, let’s face it, I
was in the grip of Ethos MANIA.
The TeleVue 8mm Ethos
The natural next acquisition was the 8mm, which, other than
being a little smaller and a little lighter than the 13 (.95 pounds vice 1.3
pounds), was every bit as impressive to both look at and look through. I have
rarely had more fun “just” observing visually than I did at the 2008 Chiefland Star Party. Again, you can get the full
story at the link, but here’s the gist:
I’m sure I’ll take some flak from the Ethos nay-sayers, but at the risk of being dubbed an “Ethos Elitist,” yes, swapping back and forth between the 13 Ethos and 13 Nagler, I was slapped in the face AFOV-wise. Going back to a “mere” Nagler was very similar to my first experience with Naglers: the Nagler ruined my Erfles and Plossls for me, and the Ethos has ruined Naglers for me. Both Tom [Clark] and I commented that, alas, the wonderful Nagler spacewalk just wasn’t so wonderful no more. Some of you won’t like me saying this, but there it is. You may think different or think you’ll think different, but that’s what I experienced on this night.
On yet another Chiefland expedition, I had the opportunity
to test the Ethos 21mm, and, better, do a shootout between it and an Explore
20mm. Not only was the ES less than half the price of the Ethos, if there were any differences in the views it presented and those of the real deal, my middle-aged
eyes weren't able to detect them. So I abandoned my plans to purchase the genuine article.
Given the observing I do, which is mostly from less than
pristine skies where I don’t much use longer focal lengths, I wasn't sure I could
justify even the lower priced ES 20. In fact, I haven’t got around to buying it
yet, though I may someday.
The 16mm Zhumell 100-degree “Happy Hand Grenade”
It would still have been nice to have something a smidge longer than the 13, however. Enter the inexpensive 16mm Zhumell 100, a.k.a. “The Happy Hand Grenade.” It’s funny how amateur
astronomy has changed in recent years, how we spoiled amateurs now
consider two-hundred-dollar eyepieces “inexpensive,” but that is the way of the
world. Compared to the $735.00 the Ethos 16 commands, I guess the $200.00 Zhumell is
cheap, though. Maybe too cheap.

The results of which were? About 70% out from field center,
the stars looked bloated in f/5 Old Betsy. At the edge they were Real Bloated. However,
I tend to focus on the field center, not the edge, and the expansive AFOV still
made for a breathtaking view. In my f/10 SCTs, the eyepiece is still not as
good as the TeleVues or Explores by any stretch of the imagination, but it is
good and I love it.
To be clear, I use the 16mm on every visual observing run
and it is the best 200 clams I have spent in a long while. Might an HHG be for
you? That depends. If you obsess about eyepiece field edges to the degree some
of the CN Eyepiece Forum worthies do (they are currently at sixes and
sevens due to something they call "EOFB," which appears to be a minor brightening
at the edge of the field they think they detect in some eyepieces), the Zhumell
is definitely not for you. You might
not be able to find a Happy Hand Grenade to buy, anyway. It seems to have
disappeared from vendors inventories of late.
Prices for considerably better longer focal length 100 AFOV
eyepieces are continuing to fall, with those of new players like William Optics
(XWA) and SkyWatcher (Myriad) dropping below the $300.00 mark now. So, you
might want to hold off even if you can find a 16 Zhumell for sale.
The B Team
The William Optics UWANs
I
liked Naglers, you liked Naglers, we all liked Naglers. Well, except for their prices, which were always up there and always painful. Oh, like you, I still paid
those prices. The 12mm Type II was one of the best oculars I've ever owned. The
Nags were expensive, though, no denying it. So, I was immediately drawn to a series of eyepieces that undercut
the prices of the TeleVue 82s by 1/3rd or more, but promised quality
that was essentially the same.
 The
William Optics UWANs (not the name of a city in China; it stands for “ultra
wide angle”) were not the first bargain 82s to hit these shores. That had begun
to happen not long after the start of this new century. By then, you could get
an 82-degree AFOV Mainland Chinese made eyepiece for just a smidge over one
C-note, but you might not be overly happy with what you got.
The
prototypical el cheapo 82 of this time was represented by the 30mm 1RPD, which
was also sold under the “Bird’s Eye” and “Knight Owl” and “Moonfish” monikers.
Some people were actually quite fond of this big 2-inch ocular, and some still
are. Mostly people with long focal length telescopes. In an f/5 Dob? The edge
of your field, and I mean the field farther out that 50% from the center,
appeared to be crowded with planetary nebulae.
There had to be a better way and there was, in the form of the aforementioned UWANs, which were made in Taiwan (and were also sold under Orion and SkyWatcher brand names for a while). These oculars, which included a 28mm, a 16mm, a 7mm, and a 4mm, were a revelation, which is why I titled my review of them “The Night Everything Changed.” Even in this day of Ethoses, when I've sold off my Naglers, I hold onto the UWANs and use them frequently.
28mm UWAN
This was the big boy. Back in the day when we all thought the
bigger and heavier the eyepiece, the better it must be, this was one impressive
mutha. It was possessed of a huge 2-inch barrel and weighed in at an awesome
2.2 pounds. If all there’d been to this thing was heft, though, it would have
stayed in the drawer with the 1RPD, but that was not all; its views were equally
impressive. As I found out when I arranged a shootout between the 28 and the
Nagler 26 one long ago night in Chiefland:
I needn't have worried about the 28mm holding its own. There was general agreement that the 28 was “as good or a little better” than the 26 Nagler in the areas of field flatness, sharpness, and edge-quality. This was on a variety of objects, including monstrous Omega Centauri with its countless tiny, tiny stars. In fact, the only time our informal panel of testers felt that the 26 Nagler pulled ahead was in (an) f/3.26 scope, and everybody agreed that its advantage, even there, was relatively slight.
 The eyepiece stacked up nearly as well against the legendary
31mm Nagler. Save for a millimeter less eye relief (18mm vice 19mm for the Nag)
it was pretty much a dead heat. This is probably a good time to say that if you
need to wear glasses to observe, few of the ultra wide eyepieces old or new are
likely to make you very happy. Things have improved of late, but the best bet
is still to remove your glasses and use the scope as your “glasses” if
possible.
The eyepiece stacked up nearly as well against the legendary
31mm Nagler. Save for a millimeter less eye relief (18mm vice 19mm for the Nag)
it was pretty much a dead heat. This is probably a good time to say that if you
need to wear glasses to observe, few of the ultra wide eyepieces old or new are
likely to make you very happy. Things have improved of late, but the best bet
is still to remove your glasses and use the scope as your “glasses” if
possible.Unfortunately, the 28mm UWAN is no longer available. Mostly because it was a relatively expensive eyepiece to produce and couldn't be sold for as much as a similar TeleVue. Today, few people would want to spend what it really needs to sell for to get an overly heavy eyepiece with an 82-degree field when they can get a lighter 100-degree for the same money. I’ll admit I don’t use it often, but when I need low power and a wide field, it can still be my goto eyepiece.
The rest of the UWAN crew is thankfully still in business,
including what may be the standout of the lot, the 16mm. At the reasonable price of $198.00 and at one
of my favorite focal lengths (Explore has a 14 and an 18 but not a 16), it is
a perennial winner. Not least because of its outstanding performance in almost
any telescope. The same is true of the 7mm (also $198.00), which is my
preferred planetary eyepiece for Dobs. It is preternaturally sharp and the nice
AFOV means I don’t have to do much nudging. I've never owned the 4mm, but I
understand it is equally impressive and a good bet if you have need of such a
short fl.
The C Team
The Televue Panoptics
I really hate to refer to the Pans as the “C team,” since,
in most respects, they are wonderful eyepieces. They are in that category
simply because I don't use them as much as my other oculars. There is a simple
reason for that: I am addicted to wide AFOVs, and 68-degrees just doesn't light my fire these days. What do I have? The 35, the 27, and the 22—I've always been
more impressed by the longer focal length versions of the Pans than the shorter
ones.
35mm TeleVue Panoptic

Optically? Sharp, very sharp. The only problem is that it's
got a lot of eye relief, 24mm, which can make eye placement a little harrowing
till you get used to the ocular. This eyepiece, coupled with an OIII filter in an f/6.5 4-inch Explore Scientific achromat, recently gave me the best view of
the North America Nebula I have had in my life.
27mm Panoptic
I don’t use it nearly as much as the 35, but the 27 is maybe even
better. Again, dead sharp and a little more comfortable to use than the 35 with
eye relief of a more “normal” (for me) 19mm. Some of my fondest memories of
deep sky observing concern the 27 in my friend Pat’s old 24-inch Dob. Down-check?
You can get an ES 20mm 100 AFOV ocular that is an outstanding performer for
$329.00, so I’m not sure there is much motivation to spend $340.00 on a 27mm
Panoptic any more.
22mm Panoptic
The 22 Pan is a good eyepiece if, in my opinion, maybe not quite the equal optically of the other two. Not quite as sharp, not quite as good
field edge performance in faster scopes, but still nice enough. Why do I hang
onto it, then? The everything else. It is light and has a hybrid
2-inch/1.25-inch barrel so I can use it in almost any scope, even my f/4 StarBlast
(where it does OK, not great). While the 22 is no longer made, it is fairly
easy to get used, if not overly common.
The eyepiece box's lid closed with a thud and I did some
thinking. What did I really need, what more glass would I really use? I couldn't
think of anything. If I just had to
spend money, it would be on the 20mm ES 100 (or one of the new WO or SkyWatcher
equivalents). That would likely replace the Happy Hand Grenade, and that might
be a good thing. I’ll see how well I tolerate using that eyepiece a lot in the
fast Dobsonians that are my main instruments now, and will perhaps come to a decision this fall/winter.
When maybe, just maybe,
the weather will improve enough for me to actually see something. What’s got my
observing stopped in its tracks has nothing to do with eyepieces, telescopes,
or my desire to get out under the stars; it is the freaking clouds. But if you
live in the U.S.A., I don’t have to tell you that. It looks like this Saturday at the club dark site will be a wash, but if I get any time in, you will hear about the first of several
new visual observing projects.
Sunday, May 10, 2015
The Old Fashioned Way

Another Free Comic Book Day
has come and gone. Avengers: Age of
Ultron is dominating Cineplex screens to no one’s surprise and will likely
continue to do so for some time. Flash
and Arrow and Gotham and Agents of Shield are winding down for the
season. But what’s going on around here?
If you read this blog regularly and closely, and especially if you are good at
reading between the lines, you are
aware I've been going through some changes with a capital “C” (I do not mean by that that I have cancer; I am physically in better shape now than I have been in years) the last several
months. I won’t bore you with the details. I will just say they are significant
and have affected many things including the way I practice astronomy.
Where have I been in (amateur) astronomy the last 5 – 7
years? I’ve been almost exclusively in the imaging camp. The closest I've come
to visual astronomy, usually, has been observing with a deep sky video camera,
with one of my Mallincams. Even out in my backyard, my normal setup has included
a telescope on a computerized goto mount, a camera, a laptop computer, often a
monitor and a digital video recorder, and assorted and numerous cables and
power supplies. Lotta stuff. But I was having fun, and my sensitive cameras
allowed me to get through The Herschel Project’s 2500 or so deep sky objects
more quickly than I’d dreamed I could.
I’ve done some crazy stuff with my Mallincams and DSLRs,
from observing quasars out on the edge of creation last
February down in Chiefland,
to getting the best comet photos (of Lovejoy) of my life. I was used to
setting up all the astro-stuff and observing with a monitor or computer instead
of my eyes, and didn't mind it a bit. Until
I did.
During the Chiefland trip, it became clear my observing
habits were, like other things in my life, going
to change. Like some other things, they needed
to change. In fact, they had to
change if I were to continue to observe. This might have happened anyway. I've
always swung back and forth between visual looking and more technologically
complicated modes of amateur astronomy, and I had been on a big-time imaging
jag at least since 2010. But there is no doubt the changes I was going through
accelerated my return to eyepieces.
So, I found myself ready—nay, anxious—to go back to a simpler sort of amateur astronomy. Which I
differentiate from my “casual” observing. Even at the height of my DSLR and CCD
and video observing, I've used grab and go scopes like the two we talked about
last week for quick peeps at the sky. When I've wanted to do serious work,
however, I've dragged out the C11 and a camera, even just for observing from
the back forty. It is that that will change.

I wanted to go simpler. No cameras. No computers (no
computerized goto mounts, at least). How would I get there? For me,
“simplicity” is spelled d-o-b-s-o-n-i-a-n. In its original and pure form, what you've
got with a Dob is a Newtonian reflector on a simple alt-azimuth mount. It’s point and shoot astronomy. Want to
look at something? You find it with a finder-scope, a zero-power reticle sight,
or setting circles (yes, on a Dobsonian). The scope moves up and down and right
and left in, if it has been built correctly, a buttery smooth fashion. There
are no motors or even locks for the altitude and azimuth axes. You push the
scope, it moves. You stop pushing, it stops. Yes, there are goto Dobsonians
today, but not for me.
I’d once embraced Dobs wholeheartedly, if for a relatively
short time, at the end of the 1980s and the beginning of the 1990s. Despite
having been away from the scopes for many a year, I still have a couple in my
inventory with a little more horsepower than the 4-inch StarBlast. The one with
the most of that is my 12.5-inch truss tube scope, Old Betsy. She’s always been
a stellar performer, and despite not always using her as much as I should, I've
never stopped loving the views she’s given me over two plus decades.
I will no doubt be using Bets a lot more now, but she didn't
seem to be the telescope for most of the backyard expeditions I had in mind, and
maybe not even for many trips to the club dark site. While she’s been modified recently
so that she’s a little lighter, she is still not a lightweight. Sure, I could
gin up a set of wheels or a wheely-bar system for her, but, even then, getting
her into the backyard sounded like work. More work that I want to devote to
telescope setup at this time.
That meant my other Dobsonian would be on deck—for a while,
anyway. This telescope really doesn't have a name. Or at least a name that
describes her in her present (elegant) form. I still call her Old Yeller. That’s because she was
originally a Konus f/5 GEM Newtonian (made by Synta) who came to me with a
hideous yellow-orange tube.
The Konus worked well despite that garish tube, and
certainly paid her way, since I did many of the observations for my book, The Urban Astronomer’s Guide with her. In the end, however, on her non-goto
CG5 mount she was just too inconvenient to set up regularly once the book was done.
That wasn't the end for the scope, however; my friend Pat needed a non-goto CG5
mount, so we worked out a deal. Pat rebuilt the scope into an elegant neo-Dob,
and I sent the CG5 to live with him.

Despite the Dob’s humble ancestry, her f/5 primary mirror is
quite good indeed, giving excellent views of the planets. The Konus delivered
some surprisingly good images of Mars when it was riding high in 2003, the year
of the great opposition. 2003 was about the time most of us had to at least
begin to admit the Chinese were beginning to produce some darn good optics.
Yeller in her current form is uber portable; I can easily carry her rockerbox in one hand and
tube in the other. She is at least as quick to set up as the C102 refractor,
and, naturally, an 8-inch brings a more to the table than the 4-inch. As I said
last time, small telescopes have their uses, but if you really want to see
lots of Stuff, deep sky or Solar System, from city or country skies, 8-inches
is where you begin. The difference between images in Old Yeller and in the
StarBlast or the C102 is simply “light years.”
Nothing is perfect, of course, and there is a fault with the
scope that needs correcting. Back when Pat and I were buying parts for the pair
of 8-inch Dobs (Pat did an identical twin for himself), focusers were not as
inexpensive and good as they are now. While we’d both used and liked JMI’s NGF
DX3, their lowest priced true Crayford at the time, we didn’t want to spend
that much for focusers for these scopes. Since the DX3 had been such a success,
we figured the company’s new bargain focuser, the RCF (“reverse Crayford
focuser”), would be good too.
I bow to no one in my respect for Jim’s Mobile Industries. I
own many of their products and just love ‘em. Except for that misbegotten RCF.
It is, I’m sorry to say, just this side of junk. While well built, more or
less, the focus mechanism just doesn't work right. It is always too loose at
one end of its travel and too tight at the other. You can adjust it so it is workable, but it will never be nearly as
good as the cheapest of today’s Chinese Crayfords. Now that I am back to the
Dobs, I hope to replace it with a Moonlite, but I can deal with it as is until
I can do that.
Alrighty then. With a clear and dry night just before the
First Quarter Moon upon me, it was time to get set up. In the interests of
keeping it SIMPLE, I left my big
observing table, the computer shelter, and all the other gimmicks I’ve used
over the last decade in my Shop. What went on the field in addition to the
telescope was a couple of wooden TV tray tables and my observing chair.

If you are going to use a low-slung Dobsonian like my f/5
comfortably, you have two choices. You can elevate it by putting the rocker
base on some kind of support like the one Orion sells (for way more money than they should if you ask me). That will work if
you want to stand while observing, but who wants to stand up to observe if you
don’t have to? There is no doubt you will see more if you are comfortable, and
the way to be comfortable while looking through a telescope is to sit.
A variety of observing chairs can work with low telescopes.
Heck you might be able to get a drummer’s throne low enough to serve. The best
solution, though, is one of the sliding seat chairs like my Buy Astro Stuff one. This chair, sold by various
merchants as a “utility” chair, will easily go low enough to make me
comfortable at the eyepiece of the 8-inch when I am scoping out objects low
down on the horizon. The seat has enough adjustment range, however, so I can also
use it with my 12-inch. I can access the finder while seated, and only have to
get up and rearrange the chair when I move to a distinctly different part of
the sky.
Ah, the finder. What sort of a finder would I be using for
my initial foray back into old-timey observing? I A Rigel Quick Finder, the
Telrad’s cousin. The QF features a Telrad-like bullseye that’s projected onto a
beam-splitter glass. That makes the red LED illuminated reticle seem to float
before the stars. There’s no magnification, nothing is inverted or reversed,
and finding objects is as simple as can be.
Why a Quick Finder instead of the Telrad? It is smaller and
is in a vertical rather than horizontal format. That makes it a better choice
for smaller scopes or for minimalist scopes like mine. It also offers something
the unmodified Telrad doesn’t: the ability to pulse the reticle on and off,
which can make it easier to position the reticle amid dim stars. If not always
that easy if your skies are light polluted.
The bottom line is that a Quick Finder or a Telrad or any
zero-power (“unit power”) finder can be difficult to use in suburbia. Oh, some
parts of the sky, areas of the sky where there are plenty of stars to lead you
to your targets, are easy enough. But spots like the region between the “arms”
of Virgo that are star poor can be difficult. You really want to have an
optical finder (which will deliver more stars than your naked eye can see) to
supplement your Quick Finder if your skies are not perfect. Unfortunately, there’s
no good way to mount one on my 8-inch, but, as you’ll soon hear, I have a
work-around.
What was on those TV tray tables? On one went my box of
eyepieces. Whether you are observing in the city or in the country, eyepiece
choice is an often complicated, potentially costly, and sometimes controversial
subject. It is one that deserves a blog of its own some Sunday soon. For now, I’ll just say I plunked my old Orion eyepiece case down
on one of those TV tables.
On the other table were my reference materials. My star
atlases. If I wanted to go completely Old Fashioned, that would be a print star atlas. I did place one on the
tray, a favorite, Sky and Telescope’s
Pocket Sky Atlas, but that wasn’t all. There was also my netbook computer.
It is a little thing, will go all night on its internal battery, and runs Deep Sky Planner and SkyTools 3 fairly well. I thought I
might eventually round up my hallowed copy of the Herald Bobroff Astro Atlas, but I didn’t believe I was quite ready
to give up those wonderful computer programs, and a little netbook seemed
humble enough to satisfy my desire for simplicity.
The Sun was soon setting and we were ready to roll, I
thought. First observation? How nice it was not to have to mess with batteries
or AC power supplies and cables. I do need a battery to power the secondary
heater on the 8-inch, but it felt like it would be dry enough that I wouldn’t
have to worry about that, which is pretty unusual down here in mid-spring, and
seemed to bode well.
Did Rod still have his mojo workin’? Could I still find
objects by looking at a chart and positioning the finder reticle among the
stars? I brought up the Messier list in SkyTools,
peered around the sky a bit, and decided M37, the great open star cluster in
Auriga, was a good place to start. It was beginning to sink in the west, but was
not yet too low. “Hokay. It’s just a couple of degrees outside a line drawn
between Beta and Theta Aurigae, and closer to Theta.” I positioned the scope
and took a look in the eyepiece, my 16mm 100-degree AFOV job, the Zhumell
“Happy Hand Grenade,” but no star nest did I see. Nudged around a little bit
and, “There she is. Little more subdued than I thought it would be.”

Despite its relatively low altitude, the cluster still looked
amazingly good. How could it not? It is one of the premier Messier objects. It
didn’t look anything like it does from Chiefland, Florida, where it often resembles
a globular rather than an open cluster, especially in a small piggybacked refractor, but it was still sweet. Even the reddish central star was obvious in the
skyglow/moonlight.
So it went with M36, M38, M35, M82, and a few others. I was
feeling good, friends. Pumped. I hadn’t lost it after all. Or I thought I hadn’t till I decided to take
a gander at M51. M51 is not exactly going to put your eye out in suburban
skies. But I’d seen it easily enough from a considerably worse location, the
backyard of a house half a mile from Bel Air Mall. It was just two smudges in
my 6-inch f/8 back then, in the early 1990s, but was visible. Surely it ought
to be more visible on this Pretty Good Night in an 8-inch from considerably
better skies.
Nope. What I saw was the dreaded Nuttin’ Honey. Took another
look at the chart. Nudged around. Tried higher power (helps to spread out
background sky glow). Nothing helped. The truth, I had to admit, was that M51
was in the worst of the light pollution, and its area is rather star poor
anyway. If I’d had an optical finder, even a 30mm like on my old 6-inch, it
would have been duck soup. But I didn’t have one. What I did have, though, were
setting circles. I decided I’d use ‘em on M51 on the next clear night.
Setting circles on an alt-azimuth mounted telescope? Yep.
People have been putting altitude and azimuth circles/scales on their
Dobsonians since the telescopes first became popular. There are some catches,
but fewer now than there used to be. Few enough that shortly after Pat and I
finished our 8-inchers, we put circles on ‘em.
You can read the whole story here,
but the gist is that I found a Cloudy Nights thread with links to .pdfs of degree circles. I had access to a large format
plotter (work) and printed a couple of circles for our scopes, and Pat did a
nice job installing them. He sandwiched the azimuth circles between the scopes’
rocker boxes and ground boards, gluing circles to ground boards, and cut windows in the rocker bottoms for
viewing the scale. In retrospect, it would have been more convenient if we’d
made the azimuth circle adjustable, for aligning it on zero, but it is
certainly workable.

The altitude indicator was a lot easier; we didn't make them,
we bought them. Larger hardware
stores (like Harbor Freight) sell angle indicators (inclinometers), large dials with pointers
to indicate the angle at which the base of the thing is tilted. They are
equipped with magnets on their bases, and it was easy to mount ferrous metal
plates to the “top” truss tubes of the scopes for attachment of the level. I
later went on to a supposedly more better gooder solution with an electronic
level indicator (also from Harbor Freight), but the thing used button cell
batteries at an alarming rate, and I went back back to the original, simple, plastic, unpowered dial
indicator.
What was the catch I mentioned above? Getting the alt-az coordinates
for objects. Obviously, as objects move across the sky their alt-azimuth
coordinates change—and surprisingly quickly. In the Stone Age of the early 1980s,
we used programmable HP calculators to get alts and azes. Input an object
name or an R.A. and declination and the calculator spat out altitude and
azimuth for the current time. That worked, but those calculators were not
exactly user friendly or inexpensive.
A little later, PC programs (for MS-DOS) appeared that would
give you altitude and azimuth coordinates of objects. Today, almost any planetarium
program for Windows or Mac will do the same. That’s not the perfect solution,
though; that came about 15 years ago. Beginning with PDAs (Palm Pilots) and
continuing on to smart phones, we now have hand held devices that will display
the current altitudes and azimuths of thousands of objects.
A couple of nights after my initial foray, I gave the
circles a go from the backyard. On this night, a big, fat Moon (sorry Diana) would
likely make finding objects via the Quick Finder difficult, so I set up the
scope with the circles in mind. That meant I leveled the telescope. If the scope
base is not close to level, objects will be farther and farther “off” as you
approach the zenith. When I am using the circles, the 8-inch sits on a little
plywood platform with screw in/out furniture sliders in the corners.
After you are level, step two is calibrating the azimuth
circle (altitude does not require any calibration). Point the scope at Polaris,
and with it in the center of the eyepiece field, set the azimuth circle to
zero. That’s where having a movable azimuth circle would be helpful. Instead, I
set the scope to zero azimuth and nudge the base till the star is centered in
the eyepiece without moving the azimuth pointer off zero. Not a big deal,
really.
Alrighty, then. First object was M3, spring’s primo globular
star cluster, which is located in a fairly star poor area. It’s always been
hard for me to find, and that was made worse on this night because the area to
the east-northeast is in the Airport Boulevard light dome. I dug my iPhone out
of my pocket, brought up Celestron’s SkyPortal
app (a free, basic version of SkySafari), hit search, entered “M3,” and requested “Info.” That got me the
current altitude and azimuth of the glob.

I exercised reasonable care in moving the scope till the
pointers were on the indicated coordinates. Be particularly scrupulous with
azimuth. With the circle on the base, beware of parallax effects if you are not
looking straight down at the pointer. The closer you get it to the indicated
azimuth, the better your results will be, natch.
I inserted the 16mm Zhumell, focused up and had a look. At
first there was no sign of M3, but a little staring brought it out. It was not
centered, but was in the eyepiece; out toward the edge of the field. In the fairly
bright sky background delivered by a 62x eyepiece, it was a little less than
obvious. While it had taken a minute or two to look the cluster up on my phone,
I was pretty sure it would have taken longer to find using the Quick Finder.
In the next half-hour or so, I did M36, M37, M38, M81, M82,
M35, M65, M66, and, eventually, even M51, which was somewhat out of the light dome
by the time I went after it. There was no doubt in my mind the analog circles
were a time saver under poor conditions. Was everything in the field of the
16mm when I stopped? No. Probably because I wasn't always careful enough with
positioning the scope. Still, whatever I wanted was always just
outside the eyepiece field and quickly swept up.
One thing that would have helped the circles would have been
a lower power, wider field finding eyepiece. But the catch is that in the sorts
of circumstances where I’d need to use setting circles—an overly bright
sky—lower power can make seeing objects difficult even if they are in the field.
Really, the only question concerning the Dob’s circles was “Do
I really want to use them?” Would that be true to my desire for “simpler”? I
decided they (or even the set of Sky Commander DSCs as on my 12-inch) would be.
At times. A big attraction of my new
observing mode is the relaxing experience of cruising the stars with a chart
and a finder. With a Moon in the sky and no optical finder on the scope, however,
that can be more frustrating than relaxing. I’ll use the circles when I need
them.
What next? One thing that may be next is a 10-inch Dobsonian. Chinese Dobs in
that aperture are surprisingly inexpensive today, and one would give me a
little extra oomph in my compromised backyard. And do that while not being
nearly as much of a pain to set up as my 12-inch. Stay tuned.
As for my visual observing agenda, I have a couple of
reasonably serious projects in mind that I can execute both from the back 40
with the 8-inch or the proposed 10-inch, and from the club dark site with the
12-inch (sometimes, anyway). I am still feeling my way with this y’all, but I
feel good, as if I have found a new lease on (observing) life.
Sunday, May 03, 2015
Shootout at the 4-inch Corral

There
is no denying that in this day of monster telescopes, when almost every amateur at least aspires to owning a 25-inch Dobsonian or a
C14 Schmidt Cassegrain, a 4-inch telescope is a small telescope. A 4-inch telescope can still be a useful telescope, however. It's not that, as my Jedi Master asserts, “Size matters not!” but there are things that
matter more than size sometimes.
In truth,
choosing a telescope for use in the backyard is a battle. A battle between what you are willing to set up and what
you’d like to look through. It is the telescopic equivalent of the life of
a giant star, which pits radiation pressure against gravity. When the star gets
old, gravity wins out. As you
get older, you may find a smaller scope wins out because of gravity.
Take me for
example. I am probably luckier than some of you—maybe many of you—in that I
have a backyard with a zenith limiting magnitude of about 5.0 on a good night. That
is better than what a lot of amateurs put up with at home, yes, but it’s
usually not good enough to inspire me to drag out the 12-inch truss-tube Dobbie
or my C11. If I had to depend only on those scopes, I’d probably never observe
from home.
Luckily I
have several four inch telescopes. Actually, I have four of them. They seem to be
multiplying like rabbits. There’s the Celestron C102 f/10 achromatic refractor, the Explore
Scientific f/6.5 4-inch achromat, my old f/10 4.25-inch Edmund Scientific GEM Newtonian,
and the StarBlast 4-inch f/4 mini-Dobsonian reflector. It’s an embarrassment of riches, with
my only problem being deciding which is most effective in my backyard. That is
what we are here to determine this Sunday morning.
I eliminated two from the running almost immediately. I love my Palomar Junior. It
wasn't my first telescope, but it was my first good telescope, and was the telescope that kept me in astronomy.
Unfortunately, while its optics (an f/10 spherical primary) are surprisingly
good, the scope is a pain to lug around. Couple its long tube with a surprisingly heavy and shaky 1960s style German equatorial mount, and the scope is most
assuredly not my choice for spur of the moment looks at the Moon during
commercials in Arrow.
Then there’s
(Dorothy's) Explore Scientific refractor. It could easily be a contender. At f/6.5, it is kinder to any mount than the C102 is. Yes, at that focal ratio there’s
going to be plenty of color, but at a recent public outreach session I was surprised
by how little purple I saw on the Moon. Still, the scope isn't much more
portable than the C102, and I believed the C102's higher focal ratio might be best for the general purpose observing I do out back.

Finally,
there’s the StarBlast, Orion’s (Synta’s, actually) powerhouse of a tiny
Dobsonian. It is as portable as portable can be, even given that unless you are
the size of GI Joe or Barbie you are going to need a table or something else to
place the little thing on. It’s given me superb views of large deep sky
objects. Particularly noteworthy were the looks I had of the North America
Nebula and the California Nebula with it at the Deep South Regional Star Gaze one year. However, there was no way I’d be
seeing those big, dim clouds from my back 40. Might the scope's fast focal
ratio actually be a handicap there? Maybe, but its uber-portability won it a
slot in what was developing into a shootout.
So, the contenders
would be Amelia, the C102 refractor, and Yoda, the StarBlast (named that for
obvious reasons). Yes, the scopes are as different as apples and oranges. A
long focal length achromat and a fast neo-Dobsonian. But I didn't care. I was
simply interested in which of these two telescopes would be best for the most
casual of my backyard observing.
Hard as it
is for me to believe, the StarBlast first came to me nearly eleven years ago. I
wasn't out to buy one of the micro-dobs that summer of 2004, but I had heard
quite a bit about the StarBlast at the Internet hangouts where amateur astronomers talked
telescopes then—and now—the Yahoogroups and Cloudy Nights. It seemed the fast little Newt was making plentiful converts and garnering numerous thumbs-up reviews from respected observers.
Still, I
wasn't in the market for one. Until the kindness of Herb York (Anacortes Telescope and Wild Bird) caused me to
find myself in possession of a gift certificate from AT&WB. What to get?
One thing I needed back then, desperately, since I was a resident of our city’s
downtown Garden District, was a portable grab and go scope. One light enough
that I could easily move it around to dodge streetlights and trees, but with more aperture than the Short Tube 80 refractor I had been using in that role. Anacortes was an Orion dealer and stocked the StarBlast. What to do
with that gift certificate seemed obvious.
What I
pulled out of the box when the Yoda arrived, and what you will find when you
order a StarBlast today, are the same. The only difference I know of
is that the price of the scope, just over 200 bucks, is actually slightly lower
than it was when I bought Yoda. Otherwise, you get a cute little f/4 reflector with
a (very) green metal-flake tube on a small particle board Dobsonian mount. The
mount is a single arm affair, but the altitude axis has adjustable tension and
ball a bearing race and the azimuth axis has Teflon pads ensuring the thing works pretty well.
The scope’s
fittings are OK and about what you’d expect at this level. The 1.25-inch rack
and pinion focuser has a metal drawtube and mechanism, but a plastic base. It
works smoothly, however, and has never been a problem in a decade of use. The
secondary is collimated with allen screws, which is a pain, but holds
collimation pretty well. The center-dotted primary is adjusted by means of
bolts and is secured with locks. Unfortunately, locking the mirror down will
change collimation slightly, so you sorta have to collimate with the locking
bolts as well. Not a big deal.
 Accessories?
Two Kellners, which are just about useless for such a fast scope. One of those
little collimation caps that ship with many Chinese Newtonians, and which is also
pretty useless for a low focal ratio Newt. One of Orion’s humble plastic “BB gun” red dot finders
that nevertheless works. A so-so manual. That is it.
Accessories?
Two Kellners, which are just about useless for such a fast scope. One of those
little collimation caps that ship with many Chinese Newtonians, and which is also
pretty useless for a low focal ratio Newt. One of Orion’s humble plastic “BB gun” red dot finders
that nevertheless works. A so-so manual. That is it.
The Celestron C102 is
officially only available at present as the Omni XLT 102 with a CG4 mount for 419.00, about twice the price of the
StarBlast. You do get a lot for your money, however, including a mount that is useful for a variety of medium-small OTAs. That’s not necessarily the best way to get a C102, though.
Celestron has been selling these 4-inch achromats since forever. Since the 1990s in their current Synta-made form, anyhow. They remain unchanged today save for cosmetic “improvements” like snazzier paint-jobs and more modern
looking fittings (on some OTAs). Thank goodness the optics have remained outstanding. But the
point is they have made so many of them that they are cheap and they are
plentiful used. AND…that’s not all. At least one major dealer has C102 sales,
seemingly yearly, which allow you to glom onto one of the OTAs (no mount) for
less than 100 dollars (!).
Lucky me
didn't even have to pay that. My good friend and fellow amateur, Pat Rochford,
had a C102 he wasn't using. He thought the scope, which he'd repainted a cool brass color and outfitted with brass focus knobs, would look good in the living
room of our new home, and gave it to me as a house-warming gift last spring.
It did look good in the living room, but I soon found it was even better in a
dark backyard.
A C102 of
any vintage is a pretty plain Jane proposition. Long steel tube. Non-adjustable
objective cell. Decent rack and pinion focuser (a 2-incher, yay!). Synta’s
standard finder mount. My 102 came with the once-standard 30mm finder. I immediately
replaced it with a red dot job and a 50mm RACI finder I got from Orion, which I
alternate depending on my mood and what I am using the scope for.
While the C102
is sweet on a CG5 class mount, I’ve got mine on my SkyWatcher AZ-4 alt-azimuth
rig. I like “point and shoot” these days, and while the long and surprisingly
heavy tube is a bit much for the
mount, the portability makes everything OK. It’s all of 2-minutes work to get
the scope, Amelia, out of the Sun Room and onto the deck or into the backyard.
 Time to get
set up. I could have placed Yoda on the table on the deck,
which would have been workable if not overly comfortable—I’d have to rearrange
when going from one side of the sky to the other—but I wanted him in the yard
to get the best view to the east, which is somewhat blocked by trees. What I
put him on was the wooden "StarBlast Stand" Pat and I built years
ago. It’s not great in grass, but it is OK. I have used the ‘Blast on the AZ-4
mount via a set of (overpriced) tube rings I got from Orion, but Amelia would
be using the AZ-4, so it was unavailable.
Time to get
set up. I could have placed Yoda on the table on the deck,
which would have been workable if not overly comfortable—I’d have to rearrange
when going from one side of the sky to the other—but I wanted him in the yard
to get the best view to the east, which is somewhat blocked by trees. What I
put him on was the wooden "StarBlast Stand" Pat and I built years
ago. It’s not great in grass, but it is OK. I have used the ‘Blast on the AZ-4
mount via a set of (overpriced) tube rings I got from Orion, but Amelia would
be using the AZ-4, so it was unavailable.
With the two
four-inchers set up side by side I waited for darkness, fidgeting more than a
little, since it was obvious haze was building in advance of clouds. In the
end, we only had time for four objects, but I gave the scopes plenty of time on
each of them, and the four I chose were rather telling.
Venus
I was antsy
to get going, and Venus, AKA, “Refractor's Bane” was shining bravely in the
gloaming, so that is where we began. I thought if anything would give Yoda a
leg up over Amelia, the Love Goddess would be it…
Yoda was
first. I inserted the 7mm Uwan 82-degree ocular, lined up Venus with the
little scope’s red dot finder, and had a look. My initial impression was “DARN! THAT IS BRIGHT!” Venus wasn't just bright at 64x; what the planet looked like
was a chromed BB sitting in the Sun. Of course there was no spurious color,
but the image was too overwhelmed by glare for me to say I was getting a good
view. I could have rounded up a colored filter, but the other problem was that
the planet, in its gibbous phase, was just too small. I ducked inside and
returned with 2x and 3x 1.25-inch Barlows.
The 2x, an
Orion Shorty, made things somewhat better. The planet was bigger, and while
still a mite bright, was bearable. I don't normally expect detail on Venus—once
in all my years of observing it I've seen the ashen light, and only a few times have I spotted darkish markings through
filters—but I want there to be the possibility of seeing detail if it is there
to be seen. In my judgment, I still needed more power. In went the 3x Barlow an
Owl Astronomy Products Barlow I've had for a while, which, coupled with the
7mm, yielded close to 200x.
That made
Cynthia bigger, but not necessarily better, I thought. Two things were
obvious: the seeing, while OK, was not
perfect, and 200x was pushing Yoda. With Venus now descending, the planet was
shimmering like hell. But more than that, the disk was slightly soft at 200x. This is an inexpensive f/4 scope, and there is only
so much you can expect. Don’t get me wrong, though, the StarBlast did a
creditable job.
Now it was
Amelia’s turn on what is the most daunting target for any refractor. No point
in fooling around. I’d start out at 145x with the 7mm Uwan barefoot in the
Intes 2-inch diagonal. “Hmm. Well, that’s
a little surprising.” I had to admit that at medium power the planet looked
surprisingly good in the C102. Dare I say it? Better than in the Newtonian.
 There was
purple, but it was a purple haze (sorry, Jimi) that surrounded the planet but did
not much impinge on the disk. Venus herself was sharp and clear, and if there'd
been detail to see, I believe she'd have given it up. Chromatic aberration
tends to get worse with magnification, but I didn't stint there, going to the
2x Shorty. At almost 300x, the planet held up well.
There was
purple, but it was a purple haze (sorry, Jimi) that surrounded the planet but did
not much impinge on the disk. Venus herself was sharp and clear, and if there'd
been detail to see, I believe she'd have given it up. Chromatic aberration
tends to get worse with magnification, but I didn't stint there, going to the
2x Shorty. At almost 300x, the planet held up well.
Jupiter
Full dark
was now upon us, and the King of the Planets was sailing high overhead. Back to
Yoda with the 7mm and the 2x Shorty. I didn't bother with just the eyepiece,
since I knew the 64x that would produce would be way too little power. For
detail, you start with 200x on Jupe. To begin, we’d see what the ‘Blast would do at 128x.
What the little
scope did was impressive. Plenty of banding, though not much detail in the
bands. The Galileans were looking a little like amoebas chugging along as the
seeing suddenly began to degrade, but, yes, Jupiter looked good, with its
color a slightly creamy hue that looked very good and
appropriate to me.
However,
128x isn't enough to see Jupiter's features easily. The human eye has an
easier time with “bigger,” and even an experienced Jupiter hand will detect
more with higher powers. I swapped out the Orion Shorty for the 3x, and had a
look. Again, I had to admit that for the planets, anyhow, 192x was pushing it
with the little green guy. I could make out more detail, but not much more. The
planet was not nearly as sharp as it had been at the lower power (I'd collimated
the scope that very afternoon and gave her an hour to cool).
The C102 began at 145x as before. Everything that had been visible with the StarBlast
was visible with the C102. And then some. After just a moment of looking, I
picked up the Great Red Spot, which was near to transiting the Meridian. Even
in seeing that was now decidedly less than good, I could make out its current
pale orange color, too. Back on the Starblast, I found I could detect the spot now that I knew it was there, but it was not easy.
At 290x with Amelia? I saw more than I did at the lower magnification, which is the true test of whether your scope is “taking” more power or delivering Empty Magnification. Single down-check? In the achromat, particularly at higher powers, the image looked more yellowish than in the reflector at comparable magnifications.
At 290x with Amelia? I saw more than I did at the lower magnification, which is the true test of whether your scope is “taking” more power or delivering Empty Magnification. Single down-check? In the achromat, particularly at higher powers, the image looked more yellowish than in the reflector at comparable magnifications.
M35
 I thought we'd
essay a couple of DSOs before the sky went totally punk, which I could tell it
was on its way to doing. I had a look at a chart generated by Cartes du Ciel on my netbook, which seemed to be
an appropriately simple computer to use with these simple telescopes, and pinned down the exact position of
Gemini’s best open cluster, M35.
I thought we'd
essay a couple of DSOs before the sky went totally punk, which I could tell it
was on its way to doing. I had a look at a chart generated by Cartes du Ciel on my netbook, which seemed to be
an appropriately simple computer to use with these simple telescopes, and pinned down the exact position of
Gemini’s best open cluster, M35.
What do
amateurs, particularly refractor loving amateurs like to say? That stars always
look better—tighter and tinier—in a refractor. So, they ought to look like
fuzzy ping-pong balls in a small aperture fast reflector, then? Nope. At both 64x
and 128x, the stars of this gorgeous cluster looked very good in Yoda. When I switched
over to the refractor (I used a 16mm Uwan in the C102 to come close to the
reflector’s lower power) the stars looked good, too. They were certainly, nice, hard points, but
better than in the StarBlast? Actually, no. What did
I note? The contrast was markedly better in the refractor. It wasn't night and
day, but there was clearly a difference. Anyway, not surprisingly, with M35
getting low neither scope showed a hint of its more distant companion cluster,
NGC 2158.
M3
Messier 3,
Canes Venatici's great globular star cluster, the premier glob of springtime,
has always been a finding demon for me. Do I approach from the Bootes side or
the Coma side? Either way, I generally fumble around for a while before I
get the big ball of stars in the field. Same old story on this night despite the 16mm Uwan's big field in Yoda. When I finally had the glob, I
upped the magnification to 128x and took a look.
Not bad, not
bad at all. The cluster was at least a little more than a round fuzzy spot (it
was quite a ways down in the Airport Boulevard light dome, so I didn't expect
too much). There was an obvious core, surrounded by a dimmer halo. However, that’s
all it was: fuzzy core surrounded by
fuzzy halo. There was some graininess, but not a hint of resolution.
In Amelia at 145x,
the view was admittedly more the same than different. However, there was more
of that graininess, and after staring for quite some time, using averted
vision, jiggling the scope, and using the other tricks I know, I convinced
myself I occasionally picked up a star or two. The bottom line was that the
image was better in the refractor than in the reflector. And it was considerably
better than the slightly higher power of the refractor would account for. M3 was our last object, with the sky suddenly closing down with a resounding
thud.
Inside,
after taking maybe ten minutes to put both scopes put to bed, I pondered. The
beauty of Yoda is that he is so portable. Even when I have to use his little
stand. Heck, he’s more portable than the C102 even when he is on the AZ-4. He’s
lighter, and his short little tube makes it easier to maneuver the rig through
doorways.
That’s the
extent of his advantage in the suburbs, unfortunately. Out in dark country, the
StarBlast can provide striking wide-field views (though not as good as those of
the 4-inch Explore Scientific in my opinion), but wide-field performance is not a factor in
judging a scope for use in my backyard.
 So why is
this? Is it because of optical quality? No, not really. The C102's objective throws
up a good star test, but the StarBlast’s parabolic primary isn't bad, either. Touch of turned-down edge, perhaps, but only a touch. The bottom line
is that the f/10 focal ratio of the C102 is just more versatile.
So why is
this? Is it because of optical quality? No, not really. The C102's objective throws
up a good star test, but the StarBlast’s parabolic primary isn't bad, either. Touch of turned-down edge, perhaps, but only a touch. The bottom line
is that the f/10 focal ratio of the C102 is just more versatile. With a 4-inch objective at f/10, I can still get to powers as low as I need in my suburban sky. And it is easy to reach higher magnifications without resorting to high power Barlows and uncomfortably short focal length eyepiece. In truth, that's the main fault of the StarBlast: it’s just too difficult to get it above 150x. It was not just that is was easier to get higher magnifications with the refractor, though. Amelia took higher power more willingly. At 200x, the StarBlast was pushing hard; at the same magnification, the refractor was just getting started.
Despite
these facts, you might enjoy a StarBlast. I have, for years. Especially if you can occasionally get the little guy to a dark site where the wide-field part of his personality can shine. For backyard use, however, the C102 or a similar
refractor seems a better solution. These scopes are
cheap and easy to get, and while the longish tube can sometimes make me say a few
Bad Words, I can still have it set up in less than five minutes and be ready to
roll without worrying about cool-down. It is the standard for my briefest and most informal backyard
observing runs. For those not so informal backyard runs? That is a subject for next Sunday...
![]()
