Sunday, March 11, 2012
Nebulosity
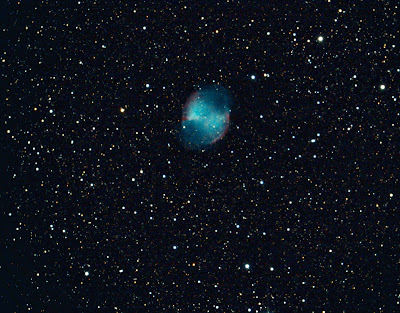 I’m a stick in the mud when it comes to astronomy software, muchachos. When I find something I like, I stick with it. Most of the time. Sometimes I can’t. I had to stop using the programs I’d cut my CCD teeth on, SBIG’s CCDops and Software Bisque’s CCDsoft. Both are still good, if looking a little long in the tooth and rarely updated, and you could do way worse for imaging and guiding. My problem was they would not work with my new camera.
Some years ago, Unk decided it was time to get on the Digital Single Lens Reflex (DSLR) bandwagon. I loved my CCD camera, a black and white ST2000 from SBIG. It produced and still produces amazing astrophotos. However, it’s a fair amount of work to get images out of it. To get color images from this monochrome camera, for example, I’d have to resort to the dread tri-color imaging. That means exposing three shots through three filters to create a final color image. That is not the sort of thing astrophotography bumbler Unk is likely to have much success with. I like black and white, but I was hungry for color.
What to do? I thought about one of SBIG’s or somebody else’s one-shot color cameras, but the fates presented me another possibility. At the time, I was finishing my book, Choosing and Using a New CAT. Specifically, I was doing the (terrestrial) photography for it. In the interest of quality, I decided it was time to join the DSLR ranks and purchased a Canon 400D, a.k.a. “Rebel XTi.” Why a Canon? I figgered if I were gonna get a DSLR, I might as well get one I could use for celestial as well as terrestrial picture taking. Every DSLR astrophotographer I spoke to and everything I read on the subject pointed me toward Canon.
The Rebel turned out to be an excellent terrestrial camera; the images I shot for the book came out great. Yeah, the printer managed to make the photos I turned-in look slightly ugly, but that is a story for another time and I was proud of what I submitted. Finishing up Choosing and Using, I realized I was short a couple of deep sky astrophotos. Why not shoot them in color with the new Canon? What would I need to do that?
 Quite a lot of new astro-stuff, it seemed. Well, throw me in the briar patch, B’rer Fox. First thing I’d need was a better mount. I wanted to shoot with my C8, Celeste, and the CG5 she normally rode on wasn’t quite up to the task. After quite a lot of hemming and hawing, which you can read about here, I settled on Synta’s EQ-6 in the form of the Orion-badged Atlas EQ-G.
What else? I had the f/6.3 focal reducer I’d used for years. While the Rebel’s chip was larger than that of the ST2000, I didn’t foresee a problem there. The Celestron f/6.3 reducer – corrector worked well for my 35mm astrophotography back in the day, and the APS sensor in the Rebel was a little smaller than a frame of 35 film. I also had the prime focus adapter I needed to hook camera to scope; all I had to buy was a Canon EOS style T-adapter. And I had a 66mm refractor and a Meade DSI to use for autoguiding. All I was missing was camera control software for the Rebel.
Actually, I could have done without that. All I’d require to enable the XTi to take long exposures would be a simple and relatively inexpensive remote shutter release, a little wired remote. I wouldn’t necessarily need a PC in the field for autoguiding, either. I could use a “standalone” guider that didn’t require a computer. But I didn’t have one, and that option would have meant yet mo’ money. All things considered, I decided I would run the DSLR from a computer, just like a “real” CCD camera.
There was a good reason for choosing that path above and beyond your stingy Unk not wanting to buy a new guide camera: focusing. I spent a lot of years guessing at focus through the dim viewfinders of film SLRs, and did not have a yen to go back to that with a DSLR, whose viewfinders are, if anything, dimmer than the one on my old Pentax K1000, or even my Nikon FM2. Since I purchased my DSLR before “live view” came to Canon DSLRs, I would need a computer program running on a laptop to allow me to focus without squinting through that dadgum peephole. The question then became “which program?”
Even at the dawn of DSLR astrophotography, there were programs available to operate a Canon camera with a computer. This penny-pinching old boy eliminated MaxDSLR (from the Maxim DL folks) in a right quick hurry. It was and is a fine program but had capabilities I didn’t need for a price I didn’t want to pay. Likewise, I struck Astroart of the list. It was good, but was aimed more at “real” CCD cameras, I thought. There were a couple of brand new ones I considered, Images Plus and Starry Night Astrophoto Suite, but I didn’t know pea turkey about either one. I was stumped.
Until one of my few remaining brain cells fired: “Hey! Don’t the guy who makes PHD Guiding, Craig Stark, have a program to run a DSLR?” Mr. Stark sure did. His Nebulosity ‘peared to be just what the doctor ordered, featuring camera control for Canon DSLRs and a focus routine that was reputed to take the agony out of getting pictures sharp. Best of all, Craig sold the program for just a wee bit more than 50 bucks, which is dang sure Unk’s speed
I still needed one more accessory, a remote shutter cable. The DSLRs of a couple of generations back like my XTi required a “shutter interface cable” to allow Nebulosity (or any other program) to control the camera. I got mine from Shoestring Astronomy, but you won’t need one today. Current Canons allow shutter control through the same USB cable that sends images to the computer.
While waiting for my cable to arrive, I played with Neb a bit, and, naturally, studied up on its features. It had a lot back then, but has come a long ways in the years since I first tried it. The feature-set below is for the current release, Nebulosity 2.5:
• Canon owners have flocked to Nebulosity, but it accommodates a wide variety of other cameras, including those from SBIG and FLI, Meade’s DSI series, and the Orion StarShoots. The full range of Canon bodies is supported: Canon DIGIC II/III/4 (1000D/Rebel XS, 500D/T1i, 550D/T2i, 450D/Rebel XSi, 400D/Digital Rebel XTi, 350D/Digital Rebel XT, 60D, 50D, 40D, 30D, 20D/20Da, 7D, 5D Mark II, 5D, 1D Mark IV, 1D Mark III, 1D Mark II N, 1D Mark II, 1Ds Mark III and 1Ds Mark II) .
• Comes in a Macintosh (OSX) flavor.
• Full suite of image processing tools including Digital Development Processing, alignment/stacking, Bad Pixel Mapping, star tightening via edge detection, Canon CR2/CRW RAW Bayer matrix loading, and 32/96-bit accuracy. That is just the beginning. Craig says one of his goals was to keep Nebulosity small and manageable and not duplicate the tools found in Photoshop, but those of us who, like Unk, don’t aspire to being the next Bob Gendler, can get along just fine with just Nebulosity.
• An interface designed to be easy to use in the field. Including by your Uncle Rod at 3 a.m.
• Frame and focus system with a Fine Focus mode. This alone is worth the price of Neb, if’n you axe me.
• If your camera supports Live View mode, Nebulosity will allow you to use that for framing and focusing, displaying the Live View image on the computer.
• Interfaces with PHD Guiding. That allows you to do things like dithering the location of images—in other words, stuff Unk would never do but which you might.
• Full control of image capture. Tell Nebulosity how long an exposure should be and how many exposures (subframes) to take, and it captures the sequence and saves it to your hard drive (as FITs files) without further user intervention.
That’s just the tip of the iceberg. The program’s complete list of features can be found in the program’s documentation, which is available as an Adobe .pdf file rat cheer.
Soon, it was time to get out in the field and find out what Nebulosity could do. My very first run with the program down at the Chiefland Astronomy Village is documented here. And you can read about my guiding system here. What we are interested this time out, howsomeever, is getting Nebulosity and your camera, which I will assume is a Canon DSLR, cranking.
First step is hooking it all up. Whether you are using a new camera or an older one, you’ll have to provide a path for images to reach the computer. What I use and have used is the camera’s USB download cable and a USB extension cord. You can get cable extenders in most computer stores, or even at the cotton pickin’ Wally-World, but remember: you don’t want to go over about 15-feet. If you simply must go longer, you’ll need a USB “booster” cable. Anyhoo, plug one end into the camera and the other into the computer.
“Which computer, Unk? How much horsepower do I need?” Not that much. If’n you are gonna use Nebulosity for processing you don’t want to skimp on RAM (2 gig is enough most of the time), but this program is not overly demanding of the processor. It runs just fine on my netbook with its somewhat speed-challenged CPU.
 If you are using an older Canon, you will, as above, need a shutter interface cable. That goes from the remote (mini-plug) socket on the Canon to a USB port on the computer. Oh, if you run the camera off’n an external power cable, don’t forget to plug that in—Unk uses the more convenient battery, which is usually sufficient. I keep a spare on hand and am not known for doing four hour exposure sequences.
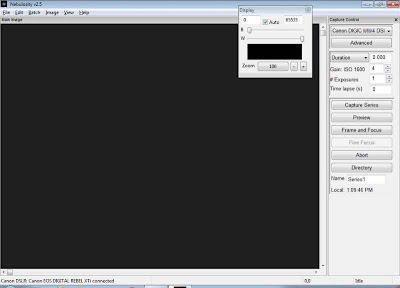
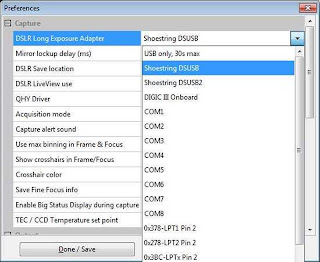
Ok, here we go... Set the exposure dial on the camera to “M,” turn it on, and wait for the Canon software window to appear, the one that asks if you want to download pictures, yadda-yadda-yadda, and dismiss it. In my experience, lighting off Neb before that is done can cause problems. If the consarned window doesn’t appear on your screen, don’t worry about it. Then, start Nebulosity by double-clicking its icon. When it comes up, you’ll see the display shown at left. If this is the first time you’ve used the program, you will, natch, need to set up a few preferences, which you do by pulling down the Edit menu and clicking, yep, “Preferences.”
The most important Preference is setting up the DSLR’s long exposure interface. Don’t do it and you’ll be like Unk the first time out with Neb: stumped and put out that he couldn’t make his Rebel go for longer than 30-seconds. If you are using an older camera and the Shoestring cable, select Shoestring DSUSB (or the newer DSUSB 2), for a current Canon, you’ll pick DIGIC III onboard.
The remaining options can be left as is for now. One exception might be “show crosshairs in Frame and Focus mode.” Having crosshairs on the image screen make it easy to get the target properly positioned and can be a big help in aligning a go-to rig if you have the camera on the scope during alignment.
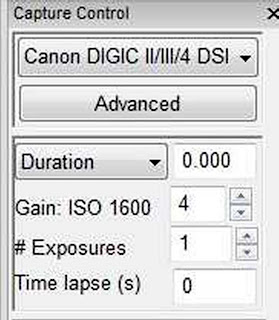 It’s now time to select and set up the camera. Choose the model of your rig in the Camera Control section on the main display via the pull-down menu. You’ll also want to set its ISO (sensitivity) with the Gain control. Since I generally like to go for shorter integrations, I set my Rebel to ISO 1600, which is still relatively low in noise.
What then? Honest to god, y’all, ain’t a whole lot more. Set an exposure of 1 or 2-seconds, enable Frame and Focus by mashing that button, reduce the zoom on the image window till you can see all—or at least most—of the frame, and get your target lined up and roughly focused. How do I focus? I’ve used a Bahtinov mask in the past, but I find that is not necessary with Nebulosity. I rough-focus on the last go-to alignment star, nudging with my JMI Motofocus (a must) till it is as small as I can get it and dimmer field stars have not only begun to appear, but look small, too.
There are actually two rough focus modes. On older cameras like mine without Live View, Neb fires your shutter continuously to update the image. Some folks worry this might wear out a DSLR’s shutter, but they will go so many tens of thousands of firing cycles that that just ain’t a concern. If your camera supports Live View, you can use “video” instead of the normal focus mode, but from what I have heard it is not sensitive enough to make focusing easy on dimmer subjects.
Once you are roughly focused, comes the magic. Press the abort button to stop Frame and Focus, push “Fine Focus,” and Nebulosity will ask you to click on a star. Do that on one on the last frame of the Frame and Focus display, which will still be onscreen. Best is a medium dim/small sparkler. Nebulosity will zoom in on it, and you can begin fine focus.
Tweak-in focus by watching the star’s image, watching a number increase that indicates star brightness, and watching a number decrease on the “half-flux-radius” focus indicator. I generally pay most attention to star size and brightness number. However you do it, you will be amazed. With Craig’s system, it is trivial to obtain exact focus. SCT user, are you? I have never been troubled by focus shift during focusing. I reckon Neb must track the star during the process.
All that remains now is to expose the target. If you’ve focused on an alignment star, you may want/need to adjust framing after you slew to the first fuzzy. If you are on an object that is an excellent focus subject, like a globular star cluster, touch-up Fine Focus if you like.
 |
| Getting focused. |
Is your exposure good? Not too underexposed or overexposed? Let’s find out. With autoguiding on and exposure duration set, mash “Preview.” That will take one frame and will show if changes are needed. Before you can get a good idea of what the image looks like, you may need to adjust image zoom and the histogram for the image display.
When Unk saw his first frame of M42 that night down at the CAV, he was appalled: way too dark with bloated stars. The solution was backing off the zoom and adjusting the histogram by moving the W slider to brighten the image. If it had been too light, I could have moved the B slider to the right. That was with an older version of Nebulosity, though. These days, you should get a good image by just leaving the “auto” box for the histogram checked.
How do you know your exposure is about right? It may be obvious by looking at it, or you may need to take a gander at the histogram. If the “spike” of the data on the graph is narrow and far to the left, you are underexposed. If it is abruptly cut off on the right, you are overexposed. How do you fix it? The sliders only control the display, not the data. To change that, you will need to shorten or lengthen your exposure. Keep in mind, too, that overexposure is always a worse thing than underexposure.
The final step before mashing the “go” button is setting up the exposure series via the “# Exposures” control right beneath “Duration.” How many individual exposures (which you will stack into a final image) should Nebulosity take? That depends on the position of the target in the sky, mostly. You want as many “subframes” as possible, but there will be a limit. You don’t want to waste time with the DSO too low in the sky to yield a good image. If you are using a German equatorial mount, you probably won’t be able to continue imaging for long after the target crosses the Local Meridian. I generally aim for at least twenty 2 – 3-minute subframes if possible.
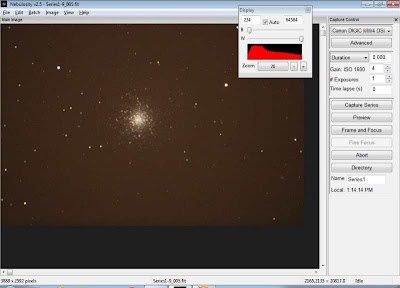 |
| Subframes coming in. |
When you are done? Go on to the next target. I generally try to do around three series, whether of three different objects or the same object. Believe you me, the combination of set up and exposing three 20 – 30 subframe sequences will burn up most of an average night.
The subframes are in the can, you’ve packed up and headed home and are warm (or cool) and cozy in your den. What now? I’ll tell you what not to do: do NOT look at the exposures. Save that for the next morning. Until you process ‘em, your subframes will look like something that came out of the wrong end of my Aunt Lulu’s poodle dog. They will look better in the morning, though. Get a good night’s—what’s left of it—sleep and start processing by the light of day.
OK, the sun is shining, the birds are chirping, and you are ready to get ‘er done. Where do you start? Start by stacking the subframes of a series into a single image. You may not want to stack every subframe. In fact, you probably won’t. Use the Image Preview Files button in the File Menu to check the frames of the series. Some may have trailed stars. Some may have an airplane cruising through ‘em. Some may have been shot when the target was a little low. And on and on. Note the frames to leave out.
To begin the stacking process, click Align and Combine Images on the Batch menu. Usually, all defaults can be left as they are. Then, select the images for stacking by clicking, Shift clicking, or Ctrl clicking on them in the file menu that appears. When you mash the “go” button, selected images will be loaded with the first one displayed onscreen. Pick a star that’s not too bright (overexposed and bloated) or dim, and click on it. Nebulosity will put a little circle around it and advance to the next frame. If all was well with scope tracking, the same star will be circled on the next image. If it is (it doesn’t have to be centered in the circle), hold down the ctrl key and click on the star. If it’s not in the circle, click on it to put it there. If you decide you don’t want to use the frame after all, hold down shift and click.
Continue in this fashion until every image has been registered (Neb will keep a running total for you at the bottom: “2 aligned, 15 to go”). When you have clicked through all the subframes, Nebulosity will stack them automatically prompt you for a file name to save the stacked image under. That is it, all stacked, no fuss, no muss. How well does it work? It works very well indeed. It is superior, in my opinion, to both Deep Sky Stacker and Registax (for deep sky images). A stacked image from Nebulosity seems better exposed and smoother.
The first thing Unk does is stack his images, but if you are an advanced worker who does things like add flat field frames and bias frames to each subframe, you will do those things before stacking. If you need more guidance on these pre-processing steps, you can find it in the many documents and tutorials linked from the Stark Labs website or in Nebulosity’s docs.
OK, you’ve stacked the subframes, but the image still doesn’t look like much. Too dark. Too light. If you, like Unk, image from areas where the sky ain’t perfect, the background probably has an ugly brownish cast. In other words, you’ve got plenty more work to do, pardner.
Like I done said, despite Craig’s desire to keep Nebulosity simple and streamlined, it includes many processing tools, some of which may be unfamiliar to you. Wadda you do? The best thing for a Neb newbie to do is to use Mr. Stark’s processing tutorials the first few times out. Doing that will ensure you get decent images and get used to the Nebulosity way of doing things. Read the original document, not just my paraphrase here.
 |
| Stacking subs into a final image. |
2. At this time, the picture is probably way too dark. Use the B/W histogram sliders to change it if you wish, but remember they only change the display, not the underlying image data.
3. The stacking process usually leaves an unsightly border around the shot. Use the Crop tool from the Image menu to fix that. When done, save the picture. Actually, “SAVE AS.” Give the image a new name so that if you paint yourself into a corner during processing you can always start back at the original stacked image.
4. If, like Unk’s light polluted images, your pic has a background color that is obviously wrong, now’s the time to fix it. Adjust Color Background (Image menu) will do that. Usually, you can just accept the defaults for the sliders on the window that pops up, but if your background still looks weird, adjust the sliders till it’s right. Save again.
5. Now is the time to get the brightness/contrast of the image, not just its display, correct. Do that by using the B and W sliders on the tool that appears when you click “Levels/Power Stretch.” Observe the histogram display as you manipulate the sliders to ensure the graph is not bunched up on the left or cut off on the right. Mostly, however, just watch the image. When it looks correctly exposed, you are done. Adjusting histogram/levels can be tough for newbies, but Craig’s excellent tutorial will help you get through it. When done, save again.
6. The rest, frankly, is just minor touchups. One of the best of Neb’s touchup tools is the Tighten Star Edges routine. If, when you zoom in, the stars look blurry, call this tool from the Image menu (under Sharpen). Where should you put the slider on the winder that appears? Usually a setting between .5 and 1 works well.
 |
| Getting rid of the nasty background color from light pollution. |
8. Step 8? Sorry pards, there AIN’T no step 8. Assuming your image data was reasonably good, Nebulosity will hand you a picture that will likely delight you after seven measly steps.
Not that there ain’t more you can do with the “finished” astrophoto. Nebulosity offers some additional tools like Digital Development that you will want to investigate once you’ve got the hang of basic processing operations. You may also want to tweak the image with an external processing program like Adobe Photoshop or Photoshop Essentials or Paintshop Pro. Which I sometimes do.
I especially favor Adobe Photoshop, since many astrophotography “plug in” tools are available for it. A particular help for me, I’ve just discovered, is a plug-in called “Gradient Xterminator.” Do you notice there are parts of your image where the background is brighter than it is in other places? That, if you use a focal reducer, the effect is like looking through a porthole? The center is brighter than the edges? If so, you can take and apply flat field frames or, like lazy old Unk, you can use Xterminator. It is reasonably priced, and really, really works.
“But Unk, I cain’t afford no Photoshop.” Yeah, the full up version of the latest CS is a big pill to swallow, but there are alternatives other than the latest and greatest Photoshop CS when it comes to image processing. Why don’t we talk about that some Sunday soon?
There you have it, Kats and Kittens: the path to image Nirvana with Nebulosity. Yes, there are other DSLR-centric image processing/camera control programs. Some folks favor the relatively new Backyard EOS, for example, and the Nikon troops gravitate to Images Plus. I have no doubt those are fine programs, but Unk has not used them. I have used Nebulosity, and I am here to tell you that it, like PHD Guiding, just WORKS. Not only that: it works without the need to expend lots of dollars and lots of fussing and figuring, which is just fine by me, muchachos.
Stop the Presses! Unk has just learned the brand-new Nebulosity 3 has just been released. It's a little more expensive than the earlier ones, but 80 bucks is still quite a bargain when it comes to imaging software. Hell, even stingy old me might upgrade given the long list of new features.
Next time: Closer to Home…
Comments:
<< Home
Thanks Unk. I'm using a 1000D and found your blog on Nebulosity very helpful in deciding which program to purchase. Already own backyard eos but, nebulosity seems like a home run for what it costs. Already use PHD guiding so this should have been a no brainier for me.. DeepSkySeeker
Thanks Unk,
I am about to buy my first scope and dive into the depths of astrophotography, i also read your blog on guiding and found your comments the most lucid and explained in a language that a raw beginner can understand, i will certainly read as many as i can,
thanks again
George
I am about to buy my first scope and dive into the depths of astrophotography, i also read your blog on guiding and found your comments the most lucid and explained in a language that a raw beginner can understand, i will certainly read as many as i can,
thanks again
George
Glad to read your informative post, keep sharing valuable information! Looking forward to seeing your notes posted.
Writing literature reviews is required when a student works on a large research paper, coursework or dissertation. When writing a literature review, many students start wondering how it should be structured and organized, so the very first thing they do is start looking for examples online, try here https://bestwritinghelp.org/articles/buy-literature-review/
Post a Comment
<< Home


