Friday, October 28, 2022
Issue 585: My Yearly M13, the 2022 Edition
Alas, ’22, while it started off promisingly enough, was the
year your Old Uncle got the covid. Purty ironic, I thought, after two years of taking
precautions, even to include staying out of Heroes Bar and Grill for the longest time(!). And having had four shots. Luckily, no doubt thanks to those shots I had an extremely mild case and was soon feeling almost normal enough to
contemplate M13.
As the year wound down and the Great Globular sunk ever
lower, though, the less likely that began to seem. You may have heard about
that post-covid tiredness some sufferers report. After I’d recovered from the plague,
I felt pretty good. For a while. I went
from not just thinking about taking my M13 snapshot to at least considering getting
back to our local star party, the Deep South Star Gaze. Then—BOOM!—I was
suddenly wondering if I could even get up from my desk and walk out to the truck
after I was done teaching my university classes. I began to think I wouldn’t
get M13 this year much less travel to the DSSG.
But… (sometimes that inevitable “but” is a good
thing) over the last week I’ve begun feeling a lot more like my old self. No, I
wasn’t going to pack up and head for the dark piney woods of Deep South but getting a telescope and camera into the backyard for some quick imaging of
M13 didn’t seem downright impossible anymore.
Ah, yes, “imaging,” “astrophotography.” If you have never
attempted it in at least semi-serious fashion (“semi-serious” being your Uncle’s
beat on a lot of things) you don’t know what a complex set of tasks it is, and
how easy it is to forget what to do and how to do it after even a short layoff.
Unk hadn’t shot a guided deep sky image in a long time, and figgered there’d be
plenty of hiccups, but I bravely began to move gear from the sunroom to the
backyard, anyhow.
‘Course, before I could move anything into the backyard, I
had to decide what to move. If you’re a regular reader of the Li’l Ol’ Blog
from Possum Swamp, you know I began reducing scope headcount rather
dramatically seven years ago. But that don’t mean Unk is exactly scope poor.
I have a brace of refractors in addition to my old friend, Emma Peel, my Edge 800 SCT. I also have a pair of GEM mounts suitable
for imaging, a Celestron Advanced VX and a Losmandy GM811G.
Choosing a scope wasn’t difficult. “Feeling better” does not
mean “at the top of my game.” I wanted a telescope that’s easy to take pictures
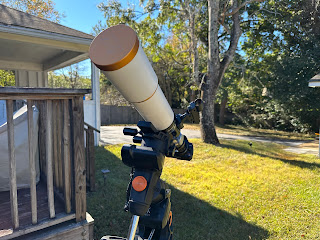
with. One that almost takes pictures by itself. That’s my 80mm William Optic
Fluorite Zenithstar. She’s an F/7, meaning the focal length is short enough
guiding is not overly necessary with reasonably brief exposures. One night a
few years back, I was out clicking off subframes with the scope, “Veronica
Lodge” by name, and thought “Man, PhD sure is guiding well tonight!” Till I
realized I’d forgot to start the autoguiding program! The images Ronnie produces
are absolutely color-free, too. Down checks? 600 millimeters of focal length
ain’t a lot for smaller targets like globular clusters.
 |
| Ronnie: Still pretty after all these years. |
The main camera, as it often is, would be my Canon Rebel XTi.
The chip size and resolution and sensitivity of the old-timer are a good match
for the 80mm. Nearly 15 years down the road, the Rebel just keeps on keepin’ on
like the dadgum Energizer battery. I mounted the Canon on the scope with the
aid of a Canon T-ring that attaches to my Hotech SCA Field Flattener (highly recommended).
In place of a battery, the Canon is powered by an AC power supply. Since
I normally operate the camera with a computer program, Nebulosity, she is tethered to the laptop with a
nice cable I got from, yep, Tether Tools.
Yeah, cables. That is one of the prime aggravations of the
imaging game. I’ve got a cable from the camera to the PC, a shutter control cable
from the Canon to the computer (the older Canons could not be triggered over
USB; I use a Shoestring Astronomy DSUSB to do
that), a USB from the guide camera to
the PC, an ST-4 cable from guide cam to the AVX’s guide input, the power supply
cord for the mount, the HC and its cable, and—well, you get the picture. It is extremely
important to be diligent about cable wrap issues.
Computer software? I’d keep that to a minimum. I’d use Sharpcap to get the
mount precisely polar aligned, the above-mentioned Nebulosity to acquire
and store photos, and PhD (II) Guiding to guide the mount. I decided not to use any mount
control software like Stellarium. I’d only be after a single target and
I figgered the good, ol’ NexStar hand control would suffice.
 |
| Cables? I has a few... |
With the stars beginning to wink on on a frankly chilly—as we
judge such things—Possum Swamp evening, came Job One, polar alignment. I used
to hate polar alignment, which, when I began astrophotography, involved either
the drift method of alignment, or using a polar finder with a polar alignment reticle.
The former took as much as a half hour, but was accurate. The latter was quick
and easy, but yielded so-so polar alignments. I’d often find myself in a hurry
to get exposures underway, and usually opted for a polar-scope alignment, which
meant my pictures suffered.
Flash forward to the turn of the last century and relief was
in sight. Almost all of us were using CCD cameras by then, so polar alignment
was slightly, but only slightly, less important. Yes, exposures were
shorter, but our imaging chips were small and the “magnification factor” inherent
in that meant field rotation due to polar misalignment showed up easily and
would make your pictures ugly. So, I still had to drift align? Nope. Celestron
automated the polar alignment process.
As the NexStar hand control matured, Celestron began to offer
a polar alignment routine in the firmware. It worked simply, but pretty well
with my old CG5. Set the mount up with the RA axis at least roughly pointed at the
Celestial Pole and do a good goto alignment. The polar align routine would then
slew the scope to where Polaris should have been if I had a perfect polar
alignment. All I had to do then was use the GEM’s azimuth and altitude
adjusters to center Polaris in the field of a reticle eyepiece, and, voila!
Perfect polar alignment.
Well, not quite. The quality of the goto alignment (and the particular
alignment stars used) could and did affect the quality of the polar alignment.
Celestron improved the routine over the years, though, and about a dozen years ago debuted the version that’s in
their hand controls to this very day, “AllStar polar alignment.” AllStar
allowed you to use a larger number of stars (though not all stars as
implied) for alignment. Improvements in the mount’s goto alignment algorithms made
an AllStar alignment good enough for most imaging tasks.
 |
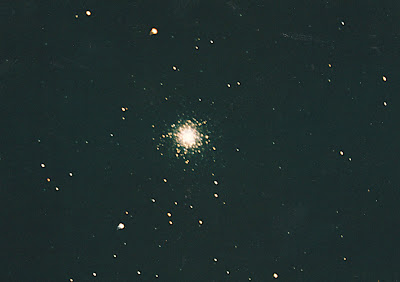
| Typical Unk film image from a long, long time ago. |
Then came Sharpcap. You can read all about it in this blog entry but suffice to say it has made
AllStar obsolete for me. The Sharpcap software uses your guide camera
(or your main camera if you’ve got a wide enough field) to do the polar
alignment. In my opinion, it’s as accurate as a good drift alignment, and much
quicker. I can have a Sharpcap polar alignment done in five minutes now.
And since it is quick and easy, I will do it. Especially in the
beginning the most important thing you can do to improve your pictures is a good
polar alignment.
So, yeah, with stars winking on, it was time to get polar
aligned. I set up a little aluminum camp table next to the scope, plunked the
laptop onto that, plugged the guide camera’s USB output into the laptop,
started Sharpcap, and we was rollin’. I was gratified to see the guidescope was
still in focus and picking up plenty of stars just past 7pm. Hit “next” a
couple of times, Sharpcap had me rotate the mount 90 degrees in azimuth, and it
was time to actually adjust the polar alignment.
The AVX is a nice mount for the price, quite an improvement
on the old CG5, but it has one problem it shares with most other imported
mounts. The bolts used for altitude and azimuth adjustment are a little course
and demonstrate a little backlash. That didn’t prevent me from getting a polar
alignment Sharpcap pronounced to be within 10” of the NCP; it just took a little
longer than it would have with my Losmandy mount and its much better alt-az
adjusters. Maybe closer to ten minutes than five.
Then, it was time to shut down and head to the local radio
club meeting. I’d wanted to get polar alignment out of the way, at least. That
would save time the following evening—I was pretty sure I wouldn’t feel like
taking pictures when I arrived home after a couple of hours with all the
friendly OMs and YLs.
The next night, as predicted, was again clear and cool, if
a little hazier and a lot damper than the previous one. It was time to screw my
courage to the sticking place and get some subframes in the can. First order of
bidness was getting the scope goto aligned. To that end I replaced the guide
scope with a red dot finder temporarily. Next, I fired up Nebulosity in Frame
and Focus mode, and it began clicking off exposures with the camera. The mount
had stopped with the telescope obviously pointing in the right direction, and I
was hoping the first alignment star would be in the frame. Nope.
Went over and peered up through the finder. Vega was near
centered. What the—? Back to the deck (the PC is on the deck on a patio table
under a dew-reducing umbrella). A look at Neb revealed the problem. It was
taking exposures alright, exposures of 0 seconds duration. Doh! Changed
that to 1 second and back at the scope used the HC to center Vega while peering
up at the laptop.
 |
| Rebel XTi |
Like the alignment stars, M13 was dern near centered when
the slew stopped, and focus, amazingly, was pretty much dead on without
adjustment. Guess someone up there was takin’ pity on your benighted Uncle who had
been rather worried about getting all this workin’ after not taking astrophoto
one for many, many months.
Finally, I set Nebulosity to take 20 1-minute lights
and 20 1-minute darks. I usually try to get 30 minutes on the Great Globular,
but it was only at about 30 degrees altitude and by the time 40 minutes had elapsed
would be real low and fuzzy. Watcha gonna do? 20 minutes was better than none. I could have gone much longer on the individual subs, but with the target down in the west in the brighter sky near the horizon, I figgered a minute would be best. I watched PhD for a while, but there weren’t nothin’ to watch. It was locked on
a guiding without complaint.
Image subframes clicking off, I strolled back into the house,
poured out a dollop of Yell, and then walked back out into the yard and stood there
next to the scope gazing up at somewhat hazy skies that were not a lot
different from those I had in Mama and Daddy’s backyard some 55 years back up the timestream.
Those familiar-looking skies encouraged my mind to wander back
to the long-ago days when M13 was new. New to and quite a pain in the
rear for the young Rodster. I wanted to see M13, maybe more even than a spiral
galaxy. But when I finally got it in the field of my puny 4-inch Edmund
Scientific Palomar Junior, I was badly disappointed. It was just a fuzz-ball…none,
not a one, of its hordes of stars were visible. Which might sound
strange. Hell, Veronica will resolve some stars in M13 with her 80mm of aperture
at high power. So why couldn’t I see a one with my Pal?
First, I didn’t know how to observe.
Most of the amateur astronomy books I had read warned against high power. Patrick
Moore practically preached against it. That being the case, I mostly just used
my 25mm focal length Kellner at about 45x. If I’d tried my 12mm eyepiece, maybe
with my Barlow, I probably would have seen some stars, but I just didn’t know.
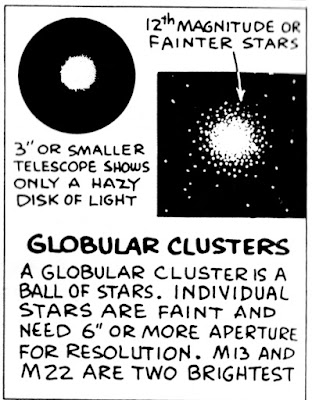
Perhaps as importantly, I didn’t know what I should be seeing. Sam Brown in his famous All About Telescopes tried to give ideas of what objects would look at in amateur telescopes, but he was a little ambiguous when it came to M13. His wonderful little picture tells us M13 is just a fuzzball in a 3-inch…and goes on to say a 6-inch is needed to resolve stars in the marvel. But what could my 4.25-inch hope to do? Maybe at least a star or two? Sam was silent on that.
Be it all as it may have been, I kept trying with M13 and loved it despite my continuing disappointments—which were not to be alleviated for some years, not till I built a 6-inch and got it to some darker-than-suburban skies.
Next day with the Sun setting, the task was getting those
flats done. I am not fancy in that regard. I make them with a couple of layers
of t-shirt material rubber-banded over the end of Veronica’s tube. It’s easy enough to
make flats, and they really do make a huge difference in processing. Unfortunately, something didn't go quite right with my flats. I'm not sure if the exposure was too short, or I didn't apply them correctly in Nebulosity. Oh, well, tomorrow is another day, I guess.
Anyhoo…how I do run on. To cut to the chase, I obtained the flats,
stacked them into a master flat, subtracted that from my lights (which had
already had dark frames applied to them), and we was done. The result? Nothing Earth-shattering,
that’s for dadgum sure. About what you’d expect for a DSLR shot from a suburban
sky with an 80mm refractor operated by an old coot who can best be described as
“astrophotography dabbler.”
But you know what? The shot is mine. I made it with my telescope.
In my backyard. Even better, I took it as a sign things are getting back to normal for Unk, and I hope for y'all too.
Clayton
John O'Hara
regards,
Dirk (Belgium)
<< Home


