Sunday, January 06, 2013
Those Crazy Computers Part II

What kind of
something? Well, you can turn off the lights and admire the pretty display of
your planetarium soft like I did with Skyglobe
3.6 back in ’93. Or you can print out charts to carry with you on your next
Observing run, which is what I used to do in the mid 1990s with Deep Space 3D. I assume, though, that what
you really, really want to do is send your telescope on go-tos from the laptop.
If that is
what you want to do, you will require two additional items beyond your software
(and a go-to capable scope/mount, natch), a serial cable and a USB – serial
converter. Occasionally, “serial cable” means just that, a straight-through off
the shelf serial cable from a computer store. If you are running EQMOD to a
SynScan mount without the aid of its hand control, that is exactly what you
need. Everybody else will require a special cable, which is almost always one
with a DB-9 connector on one end and an RJ (“telephone” style) plug on the
other.
Since the
telescope makers have not seen fit to standardize, you will need a serial cable
designed specifically for your scope. If you have a Meade, a Meade cable; if
you have a Celestron, a Celestron cable. Some other manufacturers use the same connector
layout as Meade or Celestron, but most have their own particular setups. Do not
plug a cable into your telescope unless it is designed to work with your
particular model. Serial cables have the potential for carrying voltage, and
you don’t want to fry anything by plugging the wrong cord into your beloved
scope.

The
telescope end is plugged in, but where does the other end, the DB-9 end, go?”
With today’s computers, there is
nowhere for it to go. Serial ports on PCs are now rarer than hen’s teeth, since
we amateurs are some of the very few people who still use RS-232C. Serial is
very convenient for astronomy, since it allows long runs of cable, but you have
to have a serial port on the computer to use it. Luckily, that is easy enough
to provide with a little cable/adapter that plugs into a USB port on the
computer and has a female DB-9 connector on its other end for the serial cable.
While a USB
- serial cable looks like nothing more than a cable, it is more than that. It
has active electronics in it and requires a device driver to be loaded into the
PC. In most cases, that’s easy enough to do. With modern iterations of Windows,
you plug the thing in and a driver for your USB-serial device is automatically
installed. I believe the story is the same with the Macintosh.
Any gotchas?
Not really. There are a lot of Chinese-made "copies" of the Prolific
chip set these adapters commonly use, and those clones will usually not work
with standard Windows drivers. But the Chinese manufacturers furnish compatible
drivers; it's just a little more trouble to get 'em loaded. Most of the time USB
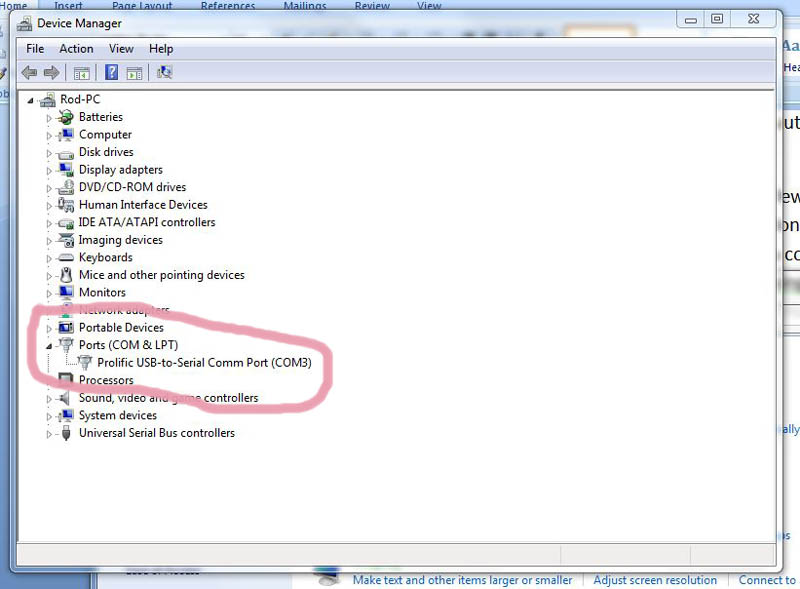
- serial converters of any pedigree work without causing any heartburn. The
only hang-up is that often a new user is not sure which com port the USB - serial
device establishes itself as. Com 1? Com 2? Com 3? What? You will have to know
the com port number to set up an astronomy program.
That’s easy
enough to find out. In Windows, bring up “Control Panel,” “Printers and Other
Hardware,” “System,” and “Device Manager” to see what the com port assignment
is (this may vary a bit depending on your flavor of windows). I assume
something similar is possible with the Macintosh, but you Apple troops know way
more about that than I do. One catch: if you plug the USB - serial converter
into a different USB port the next time you use it, it may be assigned a
different com port number.

For almost
all mounts and telescopes, that’s all there is to it. The exception is the few
rigs that eschew an RS-232 connection in favor of Ethernet. The only two mounts
I know of that go that route are the Vixen Star Book GEMs, which only offer
Ethernet coms, and the new Losmandy Gemini II computer system, which offers
Ethernet as an alternative. Setting up Ethernet communications is a little more
involved than serial, but not much, especially if you are used to fracking around
with your home network to get your computer and printers and routers playing
together. See the manual, natch.
You’re
hooked up, but that is only half the battle. Then comes driver installation. Connecting
to a telescope is much like hooking a printer to the computer. The PC has to
know what it is talking to and how to talk to it. That is accomplished by
installing a printer driver on the
computer. Same thing with telescope mounts; you install a driver.
Where it
gets a little different, or where it used to get a little different, anyways,
is the way the drivers work. The manufacturers of printers and cameras and
scanners and other common devices write drivers that are recognized by the
Operating System. All programs can use a particular driver to print, scan, or
whatever they want to do.
For a long
time, that was not the case with astronomy programs. Until fairly recently it
was unusual to have a scope maker release a driver. Wouldn’t matter much if
they had, anyway. The way things evolved, each astro-program: TheSky,
Megastar, whatever needed its own special
type of driver written especially for it. It was the authors of programs who
were doing the drivers, and their
drivers only worked with their
programs. These programs use what’s come to be called “built-in drivers.”

Assuming a built-in-driver
program supports your telescope mount, what do you have to do to get it going?
Not much, usually. Most often, all you have to do is select your telescope
model from a telescope set up window, enter the proper com port number, and
leave the defaults as they are. The driver will know all about the things like
location, time, time-zone and other settings you have entered into the program.
Back in the
late 1997, a dude named Bob Denny had a better idea. Why shouldn’t scope
drivers be like printer drivers? Why not develop a driver system for astronomy?
One that would allow a single telescope (or focuser, or CCD camera, or dome
control) driver to be used by any astronomy program. Thus was born ASCOM,
the “Astronomy Common Object Model.”
It took a
while for Bob’s system to catch on. At first it seemed odd to us that you would
have to download and install a (free) program to make your scope talk to your
computer, but in just a few years we all got over that and ASCOM became the
dominant means of communicating with telescopes. Even programs that formally
eschew ASCOM like TheSky can be configured
to work with it. The advantages? Since it’s an “open” system, anyone can write
a driver for it, and that means that somebody, whether the seller of the mount
or Joe or Jane Amateur Astronomer, writes a driver for a new mount almost as
soon as it is released. No waiting for software manufacturers’ updates.
So, what do
you have to do to make all this goodness work for you? There really ain’t a lot
to it. You download the ASCOM “platform” and install it on your machine to
start. You will also want to download and install the drivers for the mounts or
other devices you use. All that is simple; just download the files, telling
Windows you want to open rather than save them, and click through the install
dialogs saying yes to everything.

What do you
need to fill in? Latitude and longitude if ASCOM
has not already retrieved it from your planetarium program. Normally that
should be the same as the planetarium program's current "site." That
done, choose your basic scope type, "Celestron" for example by
pushing the window's "Select button."
When you
have the driver type entered, hit the "configure" button and you will
be taken to the Celestron (or whatever) driver setup window, where you will
specify a particular scope model, whether it is tracking in EQ or alt-az mode, and
what the com port (assigned to the USB –
serial cable) is. You'll see some additional fields for things like aperture,
central obstruction, etc., but you can leave those blank. The Lat/lon blanks
should already be filled in. If not put your site's position in them. "OK"
the setup window and you should be ready to roll.
Back on the
Driver Selection window (which should still be onscreen) push the Connect
button, the red box should turn green, meaning the telescope is connected to the
computer and software. If it won't connect, recheck all the steps and be sure the telescope is turned on and—Uncle
Rod often forgets to turn on the
pea-picking telescope.
Once ASCOM
is configured, you don’t have to worry about it much anymore. When you come
back next time, you shouldn't have to change anything if you are using the same
telescope; just click the Connect icon or menu item, mash “connect” on the
ASCOM dialog window, and off you go again.

One common
question I get? “Can I use ASCOM with more than one program at a time? I need
to control my scope, my dome, and my auto - guide camera.” You can, and it is
usually fairly simple. Some scope control drivers like EQMOD (for the Atlas
EQ-6/Sirius HEQ-5) work as “hubs,” allowing multiple device drivers to connect
through them. Otherwise, you can load POTH,
an ASCOM component that looks like a driver but acts as a hub allowing you to
connect to multiple drivers. There are clear instructions for using POTH on the
ASCOM site.
Is there a
drawback to ASCOM? It’s not popular with a few software developers, but based
on my experience with it stretching back over a decade, the only real problem
is that ASCOM is Windows only. There has been talk about porting ASCOM to the
Macintosh’s OSX operating system over the years, but it has never happened.
Maybe because in the past the Mac was not popular enough with amateurs to
warrant it. Now that there is much more astro-ware available for the Apple, I’m
hoping we will finally see that—and maybe an ASCOM version for the
iPhone/Pod/Pad, too. There is no ASCOM for Linux, either. I believe there is a
similar driver system, but I don’t know pea-turkey about it.
Once you’ve
got it cabled to the mount, leave the computer alone. Oh, you can power it up,
but DO NOT attempt to connect the astronomy program to the telescope. Instead,
fire up the mount and do a standard go-to alignment with the hand control. Once
you are completely done with that, then
boot the astroware and connect to the scope with ASCOM or the program’s built
in driver.
Some very
recent astronomy software, mostly apps for iPhones/Pods/Pads, can go-to align the telescope. An
example is Celestron’s SkyQ application. Used in conjunction with their new
SkyQ Link wireless rig for scope control, you can supposedly (I have not been
able to try the Link widget yet) align the Celestrons without a hand control.
After
aligning and connecting the software to the telescope, it’s just a matter of
knowing the astronomy program: how you
send the telescope on go-tos and how you sync.
Sync? What’s they-at? Sometimes you will find that when you go-to a target and
center it up with the hand control, it is no longer centered under the target cursor
on the PC screen. How do you fix that? With the computer program’s sync, which
is different from doing a sync with the telescope’s hand control.
Computer
sync makes the telescope computer and the PC computer agree that a target is
centered. Say you send the scope on a go-to from the computer. When the scope
stops, the target is not quite in the middle of the eyepiece. You center it
using the hand control. But then it's "off" in the astronomy program.
Time to sync.
Which is
easy. After you go-to a target, hit the sync menu item or icon in the astronomy
program (NOT ON THE HAND CONTROL). You will be prompted to ensure the object is
centered in the eyepiece. Do so, and push the (virtual) sync button. The
cursor/circle/FOV indicator on the PC will move to center the target. This is
useful function and is implemented in most astronomy software.
What’s the
next step in PC-telescope use for some folks? Wireless connection of the laptop
computer to the telescope. This used to be dicey, involving Bluetooth
transmitters and receivers that were hard to get going and hard to keep going.
That’s changed with the introduction of Southern
Stars’ SkyFi Wi-Fi scope control system and Celestron’s above-mentioned SkyQ link. While both these devices were
introduced to allow iPhones, iPads, and tablets to talk to telescopes, they
will work with plain old PCs, too.
Not that
I’ve tried these things. I’ve recently been tempted by SkyQ Link, since it is
advertised to allow wireless operation of NexRemote,
but I can’t entirely get past the “why?” In addition to the computer, I
typically have a camera, a battery, and a JMI Moto Focus connected to my scope.
While eliminating the computer cord would help a little with cable clutter, I’d
still have a minimum of three cords connected to the SCT, so I’m not sure
wireless scope control would help much. It would
be cool, of course.
What is the
ultimate in computer control of telescopes? Dispensing with the consarned hand
control altogether and letting the computer do everything. Thus far there are
only a few mounts that can do that. The most sophisticated of these are the two
German equatorial mounts sold by Software Bisque, the ME and the MX. They do
indeed do everything with a PC (running TheSky).
In fact, they can’t do anything without
a PC. Both are fine mounts, but the ME and even the less expensive MX are far
more capable and complex and costly than what most of us, and especially your
stingy ol' Unk, want or need.
There are two programs for the rest of us that
do allow scope control without an HC, NexRemote and EQMOD.
While they are different in origin, with NexRemote
being provided by Celestron/Synta and EQMOD being a free open-source project,
they are very similar. The primary difference being that NexRemote works with Synta’s Celestron-branded telescopes and
mounts, and EQMOD with Synta’s SynScan mounts (the Atlas/EQ-6/AZ-EQ-6, the
Sirius/HEQ-5, etc.).
For a full
rundown on these wonderful programs, investigate the links above, but what both
do is add more features (including GPS for GPSless mounts), allow everything to
be done from the PC without the hand control even being plugged into the mount,
and, maybe coolest of all, allow the use of a wireless PC gamepad (or even a
Wii remote) in lieu of the telescope hand control. I like both systems very
much, especially when I am imaging. NexRemote
and EQMOD allow me to sit at the computer and run everything instead of having
to continually get up and go to the scope, or at least hunt around for a
cotton-picking hand control.
Is this PC junk
for everybody? Nope. Give it a try and you may like it. Or you may not like it. Even astro-ware-a-holic Unk
occasionally get tired of all the stuff,
and goes back to the hand control. Sometimes I even leave the laptop at home
and enjoy my quiet Dobsonian, Old Betsy, aided only by a set of Sky Commander
digital setting circles. But there is no denying computers hooked to telescopes
have increased our capabilities. With the PC running SkyTools 3, I am at my most efficient, clicking from one object to
the next. That is, along with the Mallincam, what has allowed me to do 100 or
200 Herschel objects in one night.
So astronomy
computing is a good thing, and PC telescope connectivity is also a good thing. Yeah,
sometimes I get weary of toting all the gear, but I get more done with a PC on
the observing table and a cable hooking PC to scope. All I can say, muchachos,
is we have come a long way since SkyGlobe
3.6.
Next Time:
DOWN CHIEFLAND WAY...

![]()
